测试 Odoo
测试应用程序有多种方法。在 Odoo 中,我们有三种类型的测试
Python 单元测试(参见 Testing Python code):用于测试模型业务逻辑
JS 单元测试(参见 Testing JS code):用于对 JavaScript 代码进行独立测试
浏览(参见 集成测试):浏览模拟真实场景。它们确保 Python 和 JavaScript 部分能够正确地相互通信。
测试 Python 代码
Odoo 提供了使用 Python 的 unittest 库 测试模块的支持。
要编写测试,请在您的模块中定义一个 tests 子包装,系统会自动检查该包装中的测试模块。测试模块的名称应以 test_ 开头,并应从 tests/__init__.py 导入,例如:
your_module
├── ...
├── tests
|   ├── __init__.py
|   ├── test_bar.py
|   └── test_foo.py
并且 __init__.py 包含:
from . import test_foo, test_bar
警告
测试模块如果未从 tests/__init__.py 导入,将不会被执行
测试运行器将按照官方 unittest 文档 中所述,简单地运行任何测试用例,但 Odoo 提供了许多与测试 Odoo 内容(主要是模块)相关的实用工具和辅助功能:
- class odoo.tests.TransactionCase(methodName='runTest')[源代码]
Test class in which all test methods are run in a single transaction, but each test method is run in a sub-transaction managed by a savepoint. The transaction’s cursor is always closed without committing.
The data setup common to all methods should be done in the class method
setUpClass, so that it is done once for all test methods. This is useful for test cases containing fast tests but with significant database setup common to all cases (complex in-db test data).After being run, each test method cleans up the record cache and the registry cache. However, there is no cleanup of the registry models and fields. If a test modifies the registry (custom models and/or fields), it should prepare the necessary cleanup (
self.registry.reset_changes()).- browse_ref(xid)[源代码]
Returns a record object for the provided external identifier
- 参数
xid – fully-qualified external identifier, in the form
module.identifier- Raise
ValueError if not found
- 返回
- ref(xid)[源代码]
Returns database ID for the provided external identifier, shortcut for
_xmlid_lookup- 参数
xid – fully-qualified external identifier, in the form
module.identifier- Raise
ValueError if not found
- 返回
registered id
- class odoo.tests.SingleTransactionCase(methodName='runTest')[源代码]
TestCase in which all test methods are run in the same transaction, the transaction is started with the first test method and rolled back at the end of the last.
- browse_ref(xid)[源代码]
Returns a record object for the provided external identifier
- 参数
xid – fully-qualified external identifier, in the form
module.identifier- Raise
ValueError if not found
- 返回
- ref(xid)[源代码]
Returns database ID for the provided external identifier, shortcut for
_xmlid_lookup- 参数
xid – fully-qualified external identifier, in the form
module.identifier- Raise
ValueError if not found
- 返回
registered id
- class odoo.tests.HttpCase(methodName='runTest')[源代码]
Transactional HTTP TestCase with url_open and Chrome headless helpers.
- browser_js(url_path, code, ready='', login=None, timeout=60, cookies=None, error_checker=None, watch=False, success_signal='test successful', debug=False, **kw)[源代码]
Test js code running in the browser - optionnally log as ‘login’ - load page given by url_path - wait for ready object to be available - eval(code) inside the page
To signal success test do: console.log() with the expected success signal (“test successful” by default) To signal test failure raise an exception or call console.error with a message. Test will stop when a failure occurs if error_checker is not defined or returns True for this message
- browse_ref(xid)[源代码]
Returns a record object for the provided external identifier
- 参数
xid – fully-qualified external identifier, in the form
module.identifier- Raise
ValueError if not found
- 返回
- ref(xid)[源代码]
Returns database ID for the provided external identifier, shortcut for
_xmlid_lookup- 参数
xid – fully-qualified external identifier, in the form
module.identifier- Raise
ValueError if not found
- 返回
registered id
- odoo.tests.tagged(*tags)[源代码]
A decorator to tag BaseCase objects.
Tags are stored in a set that can be accessed from a ‘test_tags’ attribute.
A tag prefixed by ‘-’ will remove the tag e.g. to remove the ‘standard’ tag.
By default, all Test classes from odoo.tests.common have a test_tags attribute that defaults to ‘standard’ and ‘at_install’.
When using class inheritance, the tags ARE inherited.
默认情况下,测试会在相应模块安装后立即运行。也可以将测试用例配置为在所有模块安装完成后运行,而不是在模块安装后立即运行:
# coding: utf-8
from odoo.tests import HttpCase, tagged

# This test should only be executed after all modules have been installed.
@tagged('-at_install', 'post_install')
class WebsiteVisitorTests(HttpCase):
  def test_create_visitor_on_tracked_page(self):
      Page = self.env['website.page']
最常见的场景是使用 TransactionCase,并在每个方法中测试模型的一个属性:
class TestModelA(TransactionCase):
    def test_some_action(self):
        record = self.env['model.a'].create({'field': 'value'})
        record.some_action()
        self.assertEqual(
            record.field,
            expected_field_value)

    # other tests...
注解
测试方法必须以 test_ 开头
- class odoo.tests.Form(record: odoo.models.BaseModel, view: Union[None, int, str, odoo.models.BaseModel] = None)[源代码]
Server-side form view implementation (partial)
Implements much of the “form view” manipulation flow, such that server-side tests can more properly reflect the behaviour which would be observed when manipulating the interface:
call the relevant onchanges on “creation”;
call the relevant onchanges on setting fields;
properly handle defaults & onchanges around x2many fields.
Saving the form returns the current record (which means the created record if in creation mode). It can also be accessed as
form.record, but only when the form has no pending changes.Regular fields can just be assigned directly to the form. In the case of
Many2onefields, one can assign a recordset:# empty recordset => creation mode f = Form(self.env['sale.order']) f.partner_id = a_partner so = f.save()
One can also use the form as a context manager to create or edit a record. The changes are automatically saved at the end of the scope:
with Form(self.env['sale.order']) as f1:
    f1.partner_id = a_partner
    # f1 is saved here

# retrieve the created record
so = f1.record

# call Form on record => edition mode
with Form(so) as f2:
    f2.payment_term_id = env.ref('account.account_payment_term_15days')
    # f2 is saved here
For
Many2manyfields, the field itself is aM2MProxyand can be altered by adding or removing records:with Form(user) as u: u.groups_id.add(env.ref('account.group_account_manager')) u.groups_id.remove(id=env.ref('base.group_portal').id)
Finally
One2manyare reified asO2MProxy.Because the
One2manyonly exists through its parent, it is manipulated more directly by creating “sub-forms” with thenew()andedit()methods. These would normally be used as context managers since they get saved in the parent record:with Form(so) as f3: f.partner_id = a_partner # add support with f3.order_line.new() as line: line.product_id = env.ref('product.product_product_2') # add a computer with f3.order_line.new() as line: line.product_id = env.ref('product.product_product_3') # we actually want 5 computers with f3.order_line.edit(1) as line: line.product_uom_qty = 5 # remove support f3.order_line.remove(index=0) # SO is saved here
- 参数
record – empty or singleton recordset. An empty recordset will put the view in “creation” mode from default values, while a singleton will put it in “edit” mode and only load the view’s data.
view – the id, xmlid or actual view object to use for onchanges and view constraints. If none is provided, simply loads the default view for the model.
12.0 新版功能.
- save()[源代码]
Save the form (if necessary) and return the current record:
does not save
readonlyfields;does not save unmodified fields (during edition) — any assignment or onchange return marks the field as modified, even if set to its current value.
When nothing must be saved, it simply returns the current record.
- 引发
AssertionError – if the form has any unfilled required field
- property record
Return the record being edited by the form. This attribute is readonly and can only be accessed when the form has no pending changes.
- class odoo.tests.M2MProxy(form, field_name)[源代码]
Proxy object for editing the value of a many2many field.
Behaves as a
Sequenceof recordsets, can be indexed or sliced to get actual underlying recordsets.- add(record)[源代码]
Adds
recordto the field, the record must already exist.The addition will only be finalized when the parent record is saved.
- class odoo.tests.O2MProxy(form, field_name)[源代码]
Proxy object for editing the value of a one2many field.
- new()[源代码]
Returns a
Formfor a newOne2manyrecord, properly initialised.The form is created from the list view if editable, or the field’s form view otherwise.
- 引发
AssertionError – if the field is not editable
- edit(index)[源代码]
Returns a
Formto edit the pre-existingOne2manyrecord.The form is created from the list view if editable, or the field’s form view otherwise.
- 引发
AssertionError – if the field is not editable
- remove(index)[源代码]
Removes the record at
indexfrom the parent form.- 引发
AssertionError – if the field is not editable
运行测试
如果在启动 Odoo 服务器时启用了 --test-enable,则在安装或更新模块时会自动运行测试。
测试选择
在 Odoo 中,可以使用标签对 Python 测试进行标记,以便在运行测试时更方便地选择测试。
继承自 odoo.tests.BaseCase 的类(通常通过 TransactionCase 或 HttpCase)会默认被标记为 标准 和 at_install。
调用
--test-tags 可以在命令行中用于选择/筛选要运行的测试。它会隐含 --test-enable,因此在使用 --test-tags 时,不需要再指定 --test-enable。
此选项默认为 +standard,表示当使用 --test-enable 启动 Odoo 时,默认会运行标记为 ``standard``(显式或隐式)的测试。
在编写测试时,可以使用 tagged() 装饰器对 测试类 进行标记,以添加或移除标签。
装饰器的参数是标签名称,以字符串形式表示。
危险
tagged() 是一个类装饰器,它对函数或方法没有影响
标签可以以减号(-)作为前缀,以*移除*它们而不是添加或选择它们。例如,如果您不希望您的测试默认执行,可以移除 standard 标签:
from odoo.tests import TransactionCase, tagged

@tagged('-standard', 'nice')
class NiceTest(TransactionCase):
    ...
此测试默认不会被选中,要运行它,必须显式选择相关的标签:
$ odoo-bin --test-tags nice
请注意,只有标记为 nice 的测试将会被执行。要运行 同时 nice 和 standard 测试,请为 --test-tags 提供多个值:在命令行中,这些值是 相加的*(您将选择所有具有 *任意 指定标签的测试)。
$ odoo-bin --test-tags nice,standard
配置开关参数还接受 + 和 - 前缀。+ 前缀是隐含的,因此完全可选。-``(减号)前缀用于取消选择带有该前缀标签的测试,即使它们被其他指定的标签选中。例如,如果有标记为 ``standard 的测试,同时也标记为 slow,你可以运行所有标准测试,但不包括那些慢速的测试:
$ odoo-bin --test-tags 'standard,-slow'
当你编写一个不继承自 BaseCase 的测试时,该测试将不会拥有默认标签,你必须显式添加这些标签,才能将测试包含在默认的测试套件中。这在使用简单的 unittest.TestCase 时是一个常见问题,因为它们将不会被运行:
import unittest
from odoo.tests import tagged

@tagged('standard', 'at_install')
class SmallTest(unittest.TestCase):
    ...
除了标签外,你还可以指定要测试的特定模块、类或函数。--test-tags 接受的格式完整语法为:
[-][tag][/module][:class][.method]
因此,如果您想测试 stock_account 模块,可以使用:
$ odoo-bin --test-tags /stock_account
如果您想测试一个具有唯一名称的特定功能,可以直接指定:
$ odoo-bin --test-tags .test_supplier_invoice_forwarded_by_internal_user_without_supplier
这相当于
$ odoo-bin --test-tags /account:TestAccountIncomingSupplierInvoice.test_supplier_invoice_forwarded_by_internal_user_without_supplier
如果测试名称是明确的。可以一次指定多个模块、类和函数,用 , 分隔,就像使用常规标签一样。
示例
重要
测试仅会在已安装的模块中执行。如果你从一个干净的数据库开始,你需要至少使用 -i 开关来安装这些模块。之后就不再需要这个开关了,除非你需要升级该模块,在这种情况下可以使用 -u。为了简化起见,下面的示例中没有指定这些开关。
仅运行销售模块中的测试:
$ odoo-bin --test-tags /sale
从销售模块运行测试,但不运行标记为慢的测试:
$ odoo-bin --test-tags '/sale,-slow'
仅运行库存模块或标记为慢速的测试:
$ odoo-bin --test-tags '-standard, slow, /stock'
注解
-standard 是隐式的(非必填),并用于提高清晰度
测试 JavaScript 代码
测试一个复杂的系统是防止回归的重要保障,也是确保一些基本功能仍然正常运行的手段。由于 Odoo 的 JavaScript 代码库较为复杂,对其进行测试是必要的。在本节中,我们将讨论对 JavaScript 代码进行隔离测试的实践:这些测试在浏览器中运行,不应当访问服务器。
QUnit 测试套件
Odoo 框架使用 QUnit 测试框架作为测试运行器。QUnit 定义了 测试 和 *模块*(一组关联的测试)的概念,并为我们提供了基于网页的界面来执行测试。
例如,以下是一个 pyUtils 测试可能的样式:
QUnit.module('py_utils');

QUnit.test('simple arithmetic', function (assert) {
    assert.expect(2);

    var result = pyUtils.py_eval("1 + 2");
    assert.strictEqual(result, 3, "should properly evaluate sum");
    result = pyUtils.py_eval("42 % 5");
    assert.strictEqual(result, 2, "should properly evaluate modulo operator");
});
运行测试套件的主要方式是启动一个运行中的 Odoo 服务器,然后在网页浏览器中导航到 /web/tests。随后,测试套件将由网页浏览器的 JavaScript 引擎执行。
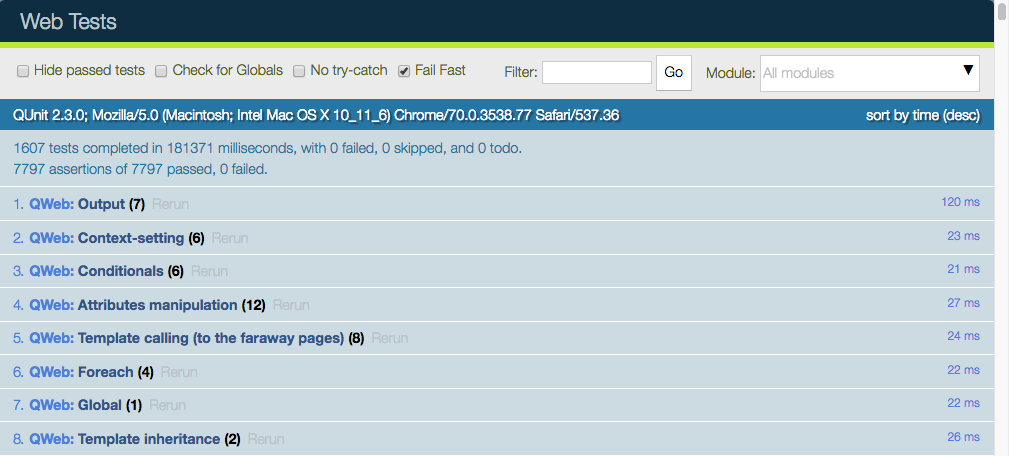
网页用户界面具有许多有用的功能:它可以仅运行某些子模块,或者筛选与字符串匹配的测试。它可以显示所有断言,无论成功或失败,重新运行特定测试,……
警告
在测试套件运行期间,请确保以下事项:
您的浏览器窗口已获得焦点,
它没有放大或缩小。需要将缩放级别精确设置为 100%。
如果并非如此,一些测试将会失败,但不会给出适当的解释。
测试基础设施
以下是测试基础设施中最重要的部分的概览:
有一个名为 web.qunit_suite 的资产包。该包包含主代码(公共资产 + 后端资产)、一些库、QUnit 测试运行器以及下面列出的测试包。
一个名为
web.tests_assets的资源包包含了测试套件所需的大部分资源和工具:自定义的 QUnit 断言、测试辅助函数、按需加载的资源等。另一个资产包 web.qunit_suite_tests,包含所有测试脚本。这通常是将测试文件添加到套件的地方。
在 web 模块中有一个 controller,它被映射到路线 /web/tests。此控制器仅渲染 web.qunit_suite 模板。
要运行测试,只需在浏览器中访问路线 /web/tests。在这种情况下,浏览器将下载所有资源,QUnit 将接管测试流程。
在 qunit_config.js 中有一些代码,当测试通过或失败时会在控制台中记录相关信息。
我们希望 runbot 也运行这些测试,因此在 test_js.py 中有一个测试用例,它只是启动一个浏览器并将其指向 web/tests 网址。请注意,
browser_js方法会启动一个无头模式的 Chrome 实例。
模块化与测试
在 Odoo 的设计方式下,任何插件都可以修改系统其他部分的行为。例如,voip 插件可以修改 FieldPhone 小部件以使用额外功能。从测试系统的角度来看,这并不是一件好事,因为这意味着当安装了 voip 插件时,插件 web 中的测试将会失败(请注意,runbot 会安装所有插件来运行测试)。
同时,我们的测试系统表现良好,因为它可以在其他模块破坏核心功能时进行检测。这个问题没有完全的解决方案。目前,我们是逐个案例来解决这个问题的。
通常,修改其他行为并不是一个好主意。在我们的 VoIP 示例中,添加一个新的 FieldVOIPPhone 小部件,并仅修改需要它的视图会更加清晰。这样,FieldPhone 小部件不会受到影响,两者都可以进行测试。
添加新的测试用例
假设我们正在维护一个插件 my_addon,并且希望为某些 JavaScript 代码(例如,位于 my_addon.utils 中的实用函数 myFunction)添加一个测试。添加新测试用例的流程如下:
创建一个新文件 my_addon/static/tests/utils_tests.js。该文件包含用于添加 QUnit 模块 my_addon > utils 的基本代码。
odoo.define('my_addon.utils_tests', function (require) {
"use strict";

var utils = require('my_addon.utils');

QUnit.module('my_addon', {}, function () {

    QUnit.module('utils');

});
});
在 my_addon/assets.xml 中,将文件添加到主测试资源中:
<?xml version="1.0" encoding="utf-8"?>
<odoo>
    <template id="qunit_suite_tests" name="my addon tests" inherit_id="web.qunit_suite_tests">
        <xpath expr="//script[last()]" position="after">
            <script type="text/javascript" src="/my_addon/static/tests/utils_tests.js"/>
        </xpath>
    </template>
</odoo>
重启服务器并更新 my_addon,或通过界面进行操作(以确保新测试文件被加载)
在 utils 子测试套件定义之后添加一个测试用例:
QUnit.test("some test case that we want to test", function (assert) {
    assert.expect(1);

    var result = utils.myFunction(someArgument);
    assert.strictEqual(result, expectedResult);
});
访问 /web/tests/ 以确保测试已执行
辅助函数和专用断言
在没有帮助的情况下,测试 Odoo 的某些部分会非常困难。特别是视图,因为它们与服务器进行通信,并可能执行许多 RPC 调用,这些需要被模拟。这就是我们开发了一些专用辅助函数的原因,这些函数位于 test_utils.js。
模拟测试函数:这些函数有助于设置测试环境。最重要的用例是模拟 Odoo 服务器给出的响应。这些函数使用一个 mock server。这是一个 JavaScript 类,用于模拟对最常见的模型方法(如 read、search_read、nameget 等)的响应。
DOM 辅助工具:用于在特定目标上模拟事件/操作。例如,testUtils.dom.click 会在目标上执行点击操作。请注意,与手动操作相比,这种方式更安全,因为它还会检查目标是否存在且可见。
创建帮助函数:它们可能是 test_utils.js 中最重要的导出函数。这些帮助函数用于创建一个小部件,带有模拟环境,以及许多细节以尽可能模拟真实条件。其中最重要的无疑是 createView。
qunit assertions: QUnit 可以通过专用断言进行扩展。对于 Odoo,我们经常需要测试一些 DOM 属性。这就是我们开发了一些断言来帮助完成这些任务的原因。例如,containsOnce 断言接收一个 小部件 / jQuery / HtmlElement 和一个选择器,然后检查目标是否恰好包含一个与 CSS 选择器匹配的元素。
例如,使用这些辅助函数,一个简单的表单测试可能如下所示:
QUnit.test('simple group rendering', function (assert) {
    assert.expect(1);

    var form = testUtils.createView({
        View: FormView,
        model: 'partner',
        data: this.data,
        arch: '<form string="Partners">' +
                '<group>' +
                    '<field name="foo"/>' +
                '</group>' +
            '</form>',
        res_id: 1,
    });

    assert.containsOnce(form, 'table.o_inner_group');

    form.destroy();
});
请注意使用了 testUtils.createView 辅助函数和 containsOnce 断言。此外,测试结束时正确销毁了表单控制器。
最佳实践
按任意顺序:
所有测试文件应添加到 some_addon/static/tests/ 目录中
对于错误修复,确保在没有修复时测试失败,并在修复后通过。这可以确保修复确实有效。
尽量使用测试所需的最少代码量。
通常,两个小测试比一个大测试更好。较小的测试更容易理解和修复。
始终在测试后进行清理。例如,如果你的测试实例化了一个小部件,应在最后将其销毁。
不需要有完全和完整的代码覆盖率。但添加一些测试会非常有帮助:它能确保你的代码不会完全崩溃,并且在修复一个错误时,往现有的测试套件中添加一个测试会变得容易得多。
如果你想要检查某个负面断言(例如,一个 HtmlElement 不具有特定的 CSS 类),那么请在同一个测试中添加对应的正面断言(例如,通过执行一个会改变状态的操作)。这将有助于避免将来测试变得无效(例如,如果 CSS 类被修改)。
提示
仅运行一个测试:你可以(临时地)将 QUnit.test(…) 定义改为 QUnit.only(…)。这有助于确保 QUnit 仅运行此特定测试。
调试标志:大多数创建实用函数都有一个调试模式(通过 debug: true 参数激活)。在这种情况下,目标小部件将被放入 DOM 中,而不是隐藏的 QUnit 特定测试用例,同时会记录更多信息。例如,所有模拟的网络通信都可以在控制台中查看。
在处理失败的测试时,通常会添加调试标志,然后注释掉测试的结尾部分(特别是销毁调用)。通过这种方式,可以直接查看小部件的状态,甚至更好地通过点击或与小部件交互来操作它。
集成测试
测试 Python 代码和 JS 代码是很有用的,但这并不能证明网页客户端和服务器能够协同工作。为了实现这一点,我们可以编写另一种类型的测试:游览(tours)。一个游览是一个有趣业务流程的微型场景。它解释了应该遵循的一系列步骤。然后测试运行器将创建一个 PhantomJs 浏览器,将其指向正确的网址,并根据场景模拟点击和输入操作。
编写测试流程
结构
要在 your_module 中编写一个测试流程,首先需要创建所需的文件:
your_module
├── ...
├── static
|   └── tests
|       └── tours
|           └── your_tour.js
├── tests
|   ├── __init__.py
|   └── test_calling_the_tour.py
└── __manifest__.py
你可以执行以下操作:
更新
__manifest__.py以在资源中添加your_tour.js。'assets': { 'web.assets_tests': [ 'your_module/static/tests/tours/your_tour.js', ], },
将
__init__.py文件中的内容更新,以导入test_calling_the_tour文件。
另请参见
JavaScript
通过注册来设置您的导航。
import tour from 'web_tour.tour';
tour.register('rental_product_configurator_tour', {
    url: '/web',  // Here, you can specify any other starting url
    test: true,
}, [
    // Your sequence of steps
]);
添加任何你想要的步骤。
每个步骤至少包含一个触发器。您可以使用 预定义步骤,也可以编写自己的个性化步骤。
以下是一些步骤的示例:
Example
// First step
tour.stepUtils.showAppsMenuItem(),
// Second step
{
   trigger: '.o_app[data-menu-xmlid="your_module.maybe_your_module_menu_root"]',
   isActive: ['community'],  // Optional
   run: "click",
}, {
    // Third step
},
Example
{
    trigger: '.js_product:has(strong:contains(Chair floor protection)) .js_add',
    run: "click",
},
Example
{
    isActive: ["mobile", "enterprise"],
    content: "Click on Add a product link",
    trigger: 'a:contains("Add a product")',
    tooltipPosition: "bottom",
    async run(helpers) { //Exactly the same as run: "click"
      helpers.click();
    }
},
以下是您自定义步骤的一些可能参数:
触发器: 必填,选择器/元素,用于对它执行动作。旅程将在该元素存在且可见后,才对该元素执行动作。
run: 可选,对 触发器 元素执行的动作。如果没有
run,则不执行任何操作。该动作可以是:
一个函数,异步执行,以触发器的
Tip作为上下文(this),并将动作辅助工具作为参数。其中一个动作辅助函数的名称,将在触发元素上运行:
检查确保检查了 触发器 元素。此辅助函数仅适用于
<input[type=checkbox]>元素。清除清除 触发器 元素的值。此辅助函数仅适用于
<input>或<textarea>元素。点击点击 触发器 元素,执行所有相关的中间事件。
dblclick,与
click相同,但重复两次。拖拽并放置 target模拟将 触发器 元素拖动到
目标的过程。编辑 content清除元素,然后填写内容。
编辑器 content聚焦 触发器 元素(wysiwyg),然后按下 内容。
填充 content聚焦 触发器 元素,然后按下 内容。此辅助工具仅适用于
<input>或<textarea>元素。悬停在 触发器 元素上执行悬停序列。
按下 content执行键盘事件序列。
范围 content聚焦 触发器 元素并设置
内容为值。此辅助函数仅适用于<input[type=range]>元素。选择 value在 触发器 元素上执行选择事件序列。通过其
value选择选项。此辅助函数仅适用于<select>元素。selectByIndex index与
select相同,但通过其index选择选项。请注意,第一个选项的索引为 0。按标签选择 label与
select相同,但通过其label选择选项。取消勾选确保 触发器 元素未被选中。此辅助函数仅适用于
<input type="checkbox">元素。
isActive: 可选,仅当 isActive 数组中的所有条件都满足时才会激活该步骤。 - 浏览器处于 桌面 或 移动 模式。 - 该向导涉及 社区版 或 企业版。 - 向导在 **自动**(runbot)或 **手动**(引导)模式下运行。
tooltipPosition: 可选,
"top"、"right"、"bottom"或"left"。在运行交互式引导时,将提示框定位在 目标 的哪个位置。内容:可选但推荐使用,为交互式导航中的提示框内容,同时会记录到控制台,非常有助于跟踪和调试自动化导航。
超时时间: 等待步骤可以
run的时间,单位为毫秒,10000(10 秒)。
重要
最后一步(或最后几步)的引导应始终将客户端带回“稳定”状态(例如,没有正在进行的编辑),并确保所有副作用(网络请求)已完成执行,以避免在清理过程中出现竞争条件或错误。
另请参见
Python
要从 Python 测试启动一个引导教程,请让类继承自 HTTPCase,并调用 start_tour:
def test_your_test(self):
    # Optional Setup
    self.start_tour("/web", 'your_module.your_tour_name', login="admin")
    # Optional verifications
调试提示
在浏览器中查看演示之旅
有三种不同的方法,各有优缺点:
watch=True
在通过测试套件本地运行导航时,可以向 browser_js 或 start_tour 电话添加 watch=True 参数:
self.start_tour("/web", code, watch=True)
这将自动打开一个 Chrome 窗口,并在其中运行引导流程。
- 优势
如果导航有 Python 设置/周围代码,或者包含多个步骤,始终有效
可以完全自动运行(只需选择启动导游的测试)
事务性(*应*始终可以多次运行)
- 缺点
仅在本地运行
仅在测试/导航可以本地正确运行时有效
调试=True
当通过测试套件在本地运行一个导航流程时,可以向 browser_js 或 start_tour 电话 添加 debug=True 参数:
self.start_tour("/web", code, debug=True)
这将自动打开一个全屏的 Chrome 窗口,其中包含开发者工具,并在导航的开始处设置了一个调试断点。导航是通过 debug=assets 查询参数运行的。当抛出错误时,调试器会在异常处停止。
- 优势
与模式
watch=True相同的优势更易于调试的步骤
- 缺点
仅在本地运行
仅在测试/导航可以本地正确运行时有效
通过浏览器运行
可以通过浏览器用户界面启动导航,也可以通过调用
odoo.startTour(tour_name);
在 JavaScript 控制台中,或者通过在网址中设置 ?debug=tests 来启用 测试模式,然后在调试菜单中选择 开始导航 并选择一个导航流程:

- 优势
更容易运行
可以在生产环境或测试站点上使用,而不仅限于本地实例
允许以“引导”模式运行(手动步骤)
- 缺点
使用涉及 Python 设置的测试流程时更难操作
可能因导游的副作用而无法多次运行
小技巧
可以使用此方法观察或与需要 Python 设置的旅程进行交互:
在相关旅程开始前添加一个 python 断点(
start_tour或电话调用)当断点被触发时,在浏览器中打开实例
运行向导
此时,Python 设置将对浏览器可见,导航也将能够运行。
如果你希望测试在之后继续执行,可以根据旅程的副作用,注释掉 start_tour 或 browser_js 的调用。
浏览器_js 测试期间的截图和屏幕录像
当从命令行运行使用 HttpCase.browser_js 的测试时,会以无头模式使用 Chrome 浏览器。默认情况下,如果测试失败,在失败时刻会拍摄一张 PNG 截图并保存到
'/tmp/odoo_tests/{db_name}/screenshots/'
自 Odoo 13.0 起,新增了两个命令行参数以控制此行为:--screenshots 和 --screencasts
调试步骤
在尝试修复/调试一个操作向导时,失败时的截图可能并不总是足够。在这种情况下,查看某些或每个步骤发生的情况可能会很有帮助。
虽然在“引导流程”中这相对简单(因为它们主要由用户显式驱动),但在运行“测试”路线或通过测试套件运行路线时则更为复杂。在这种情况下,主要有两个技巧:
调试模式下(debug=True)的一个步骤属性
break: true,。这会在步骤开始处添加一个调试断点。你可以根据需要在其他位置添加自己的断点。
- 优势
非常简单
旅程在您恢复执行后继续
- 缺点
页面交互受到限制,因为所有 JavaScript 已被阻止
调试模式下(debug=True)的一个步骤属性
pause: true,。旅程将在该步骤结束时停止。这允许在开发人员准备好通过在浏览器控制台中输入 play(); 继续之前,对页面进行检查和交互。
- 优势
允许与页面进行交互
没有与此情况无关的调试器 UI
一个带有
run() { debugger; }动作的步骤。这可以添加到现有步骤中,也可以是一个新的专用步骤。一旦步骤的 触发器 匹配成功,JavaScript 执行将被停止。
- 优势
简单
旅程在您恢复执行后继续
- 缺点
页面交互受到限制,因为所有 JavaScript 已被阻止
调试器在尝试查找步骤中定义的目标元素之后被触发。
性能测试
查询次数
测试性能的一种方法是测量数据库查询。手动测试时,可以使用 --log-sql 命令行参数。如果您想确定某个操作的最大查询次数,可以使用集成在 Odoo 测试类中的 assertQueryCount() 方法。
with self.assertQueryCount(11):
    do_something()