开始

When you first open your Odoo Accounting app, the Accounting Dashboard welcomes you with a step-by-step onboarding banner, a wizard that helps you get started. This onboarding banner is displayed until you choose to close it.

在入门横幅中可见的设置仍然可以通过转到 会计 ‣ 配置 ‣ 设置 进行修改。

注解

Odoo会根据在数据库创建时选择的国家,自动为您的公司安装适当的 财务本地化包 。这样,正确的账户、报告和税收就可以立即使用。有关财务本地化包的更多信息,请单击此处: 点击这里

会计入门横幅

逐步会计入门横幅由四个步骤组成:

Odoo会计中的逐步入门横幅
  1. 会计期间

  2. 银行账户

  3. 税费

  4. 科目表

会计期间

Define the Fiscal Years’ opening and closing dates, which are used to generate reports automatically, and set your Tax Return Periodicity, along with a reminder to never miss a tax return deadline.

默认情况下,开账日期设置为1月1日,结账日期设置为12月31日,因为这是最常见的用法。

注解

你也可以通过转到 会计 ‣ 配置 ‣ 设置 ‣ 会计期间 并更新值来更改这些设置。

银行账户

Connect your bank account to your database and have your bank statements synced automatically. To do so, find your bank in the list, click Connect, and follow the instructions on-screen.

注解

点击这里 获取有关此功能的更多信息。

If your Bank Institution can’t be synchronized automatically, or if you prefer not to sync it with your database, you can also configure your bank account manually by typing its name, clicking Create your Bank Account, and filling out the form.

  • Name: the bank account’s name, as displayed in Odoo.

  • Account Number: your bank account number (IBAN in Europe).

  • Bank: click Create and edit to configure the bank’s details. Add the bank institution’s Name and its Identifier Code (BIC or SWIFT).

  • Code: this code is your Journal’s Short Code, as displayed in Odoo. By default, Odoo creates a new Journal with this short code.

  • Journal: This field is displayed if you have an existing bank journal that is not linked yet to a bank account. If so, then select the Journal you want to use to record the financial transactions linked to this bank account or create a new one by clicking Create and Edit.

注解

  • You can add as many bank accounts as needed with this tool by going to Accounting ‣ Configuration ‣ Add a Bank Account.

  • 点击这里 了解有关银行账户的更多信息。

税费

This menu allows you to create new taxes, (de)activate, or modify existing taxes. Depending on the localization package installed on your database, taxes required for your country are already configured.

注解

Click here for more information about taxes.

科目表

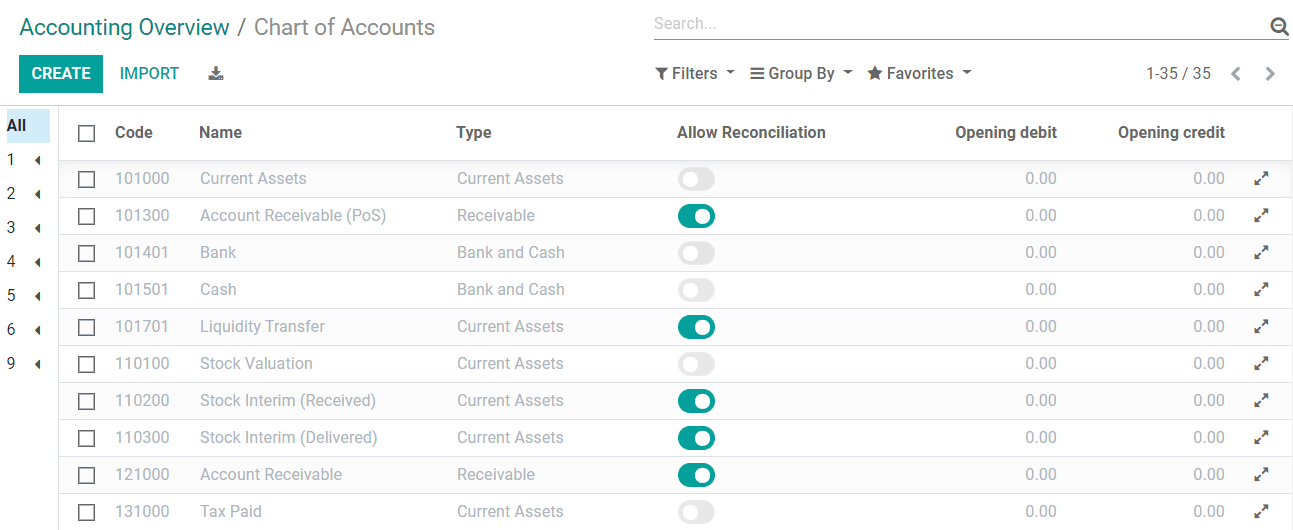
使用此菜单,您可以将账户添加到您的 科目表 中,并指定它们的初始余额。

Basic settings are displayed on this page to help you review your Chart of Accounts. To access all the settings of an account, click on the Setup button at the end of the line.

在Odoo会计中设置账户表和其期初余额

注解

点击这里 获取有关如何配置您的会计科目表的更多信息。

发票开票引导横幅

There is another step-by-step onboarding banner that helps you take advantage of your Odoo Invoicing and Accounting apps. The Invoicing onboarding banner is the one that welcomes you if you use the Invoicing app rather than the Accounting app.

如果您的数据库中已安装了Odoo会计模块,您可以通过转到 会计 ‣ 客户 ‣ 发票 来访问它。

The Invoicing onboarding banner consists of four main steps:

Odoo发票中的逐步入门横幅
  1. 公司数据

  2. Documents Layout

  3. 创建发票

  4. 在线支付

公司数据

Add your company’s details, such as the name, address, logo, website, phone number, email address, and Tax ID or VAT number. These details are then displayed on your documents, such as invoices.

注解

You can also change the company’s details by going to Settings ‣ General Settings, scrolling down to the Companies section, and Update Info.

Documents Layout

Customize the default invoice layout.

注解

You can also change the invoice layout by going to Settings ‣ General Settings, scrolling down to the Companies section, and clicking Configure Document Layout.

创建发票

创建您的第一张发票。

小技巧

在页脚中添加您的 银行账号一般条款和条件 的链接。这样,您的联系人可以在线找到您的GT&C的全部内容,而不必在您发出的发票上打印它们。

在线支付

Get started with Stripe and enable secure integrated credit and debit card payments within Odoo.

小技巧

To use other payment providers, go to Invoicing –> Configuration –> Payment Providers and enable the desired providers.

另请参阅