调查问卷
Companies gather valuable insights from customers and employees through surveys, aiding informed decision-making.
With Odoo Surveys, users create various surveys, questionnaires, certifications, assessments, and so much more. These can be used to collect feedback, evaluate the success of a recent event, and measure the satisfaction of customers and/or employees. This process yields valuable insights into shifting market trends.
Create surveys
Discover how to create surveys with Odoo.
Scoring surveys
Learn how to create and analyze survey scores with Odoo.
Create questions
See how to create, configure, and customize all types of survey questions with Odoo.
Live Session surveys
Find out everything there is to know about Odoo’s unique Live Session surveys.
Survey analysis
Explore the various ways to analyze surveys using Odoo’s in-depth reporting pages.
仪表板
Upon opening the Surveys application, Odoo presents the main dashboard of the Surveys application, otherwise known as the Surveys page.
小技巧
The Surveys dashboard can be accessed at any time throughout the application by clicking
from the header menu.In the upper-left corner, there is a New button. When clicked, Odoo presents a blank survey form that can be used to create a survey.
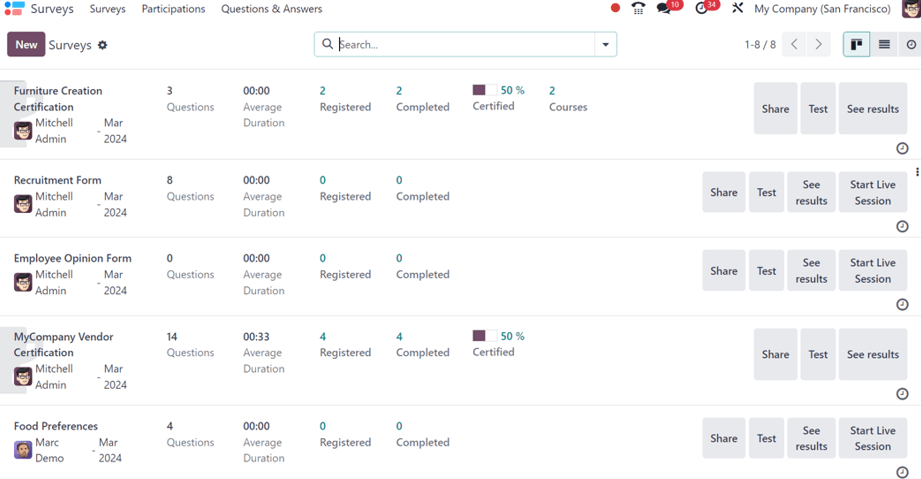
On the dashboard, all the surveys that have been created in the database are displayed in a default Kanban view.
From left-to-right, after the survey name, the user who is responsible for it, and the month it was created, each line on the Surveys dashboard shows the following:
Number of Questions in that particular survey
Average Duration of the survey (how long it typically takes a participant to complete)
Number of Registered participants for the survey
Number of times that particular survey has been Completed
Percentage and data bar showcasing how many people have Passed or become Certified
注解
The Passed percentage and bar only appears when a Required Score has been configured for that particular survey.
The Certified percentage and bar only appears if that particular survey has the Is a Certification option enabled on the survey form.
If neither Passed nor Certified appear on the line, that indicates the survey is without a Required Score and was not enabled with the Is a Certification option.
Number of Courses related to that survey, which only appears if more than one course has been created and attached to a single survey
注解
A half-trophy background image behind the survey name indicates that the survey is a Certification.
To the far-right of those data points on the survey lines, located on the Surveys application dashboard, are a collection of buttons.
Those buttons are as follows:
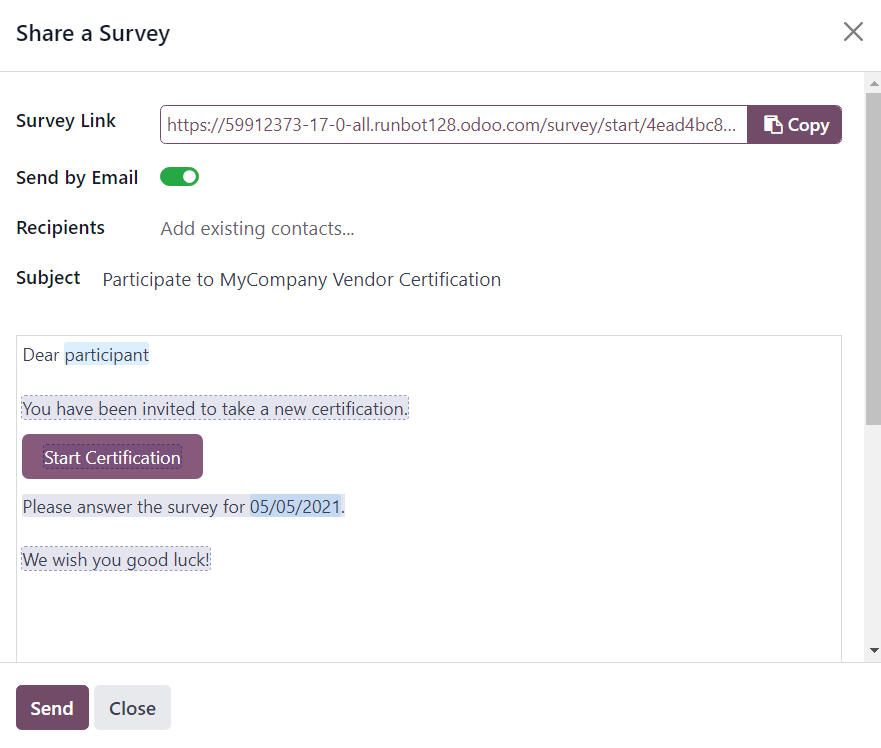
Share: click to reveal a Share a Survey pop-up form that can be used to invite potential participants to the survey - complete with a Survey Link that can be copied and sent to potential participants, and a Send by Email toggle switch.
When the Send by Email toggle is active (green switch), additional fields appear, in which Recipients, Additional Emails, and a Subject can be added to the email.
Below that, a dynamic email template, complete with a Start Certification button appears, which can be modified, as well, if needed.
Attachments can be added to the email, as well as an Answer deadline can be set, if needed.
Once modifications are complete, click Send to send that email invite to all the email addresses/contacts listed in the Recipients field.
小技巧
The default Mail Template for survey invites can be edited by navigating to and searching for
Survey: Invite
.注解
The Send by Email toggle switch is not present when the survey line has zero questions.
The Survey Link only appears when the survey’s Access Mode is set to Anyone with the link.
The Additional Emails field only appears when the survey’s Require Login field is not active.
Test: click to take a test version of the survey in a new tab, from the point-of-view of a survey participant, in order to check for any errors or inconsistencies.
See results: click to reveal a new tab showcasing detailed metrics and graphical representations of all survey participants, questions, and responses for deeper analysis.
Start Live Session: click to initiate a Live session survey, and reveal a session manager window in a new tab. This button is not present for surveys that have enabled the Is a Certification option on the survey form.
End Live Session: click to end a Live session survey that has been officially started. This button option only appears on survey lines that have previously initiated a live session.
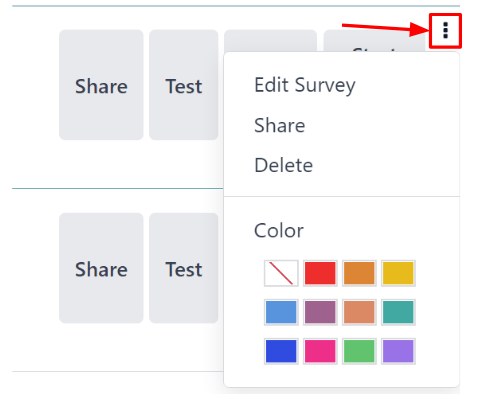
Above the buttons that are located to the far-right of the survey lines, a ⋮ (three dots) icon appears when the cursor hovers over that particular line. When the ⋮ (three dots) icon is clicked, a drop-down menu with some configuration-related options appear:
The options are:
Edit Survey: when clicked, Odoo reveals the survey form for that particular survey, which can then be modified in a number of different ways.
Share: when clicked, Odoo reveals the Share a Survey pop-up form that can be used to invite potential participants to the survey.
Delete: when clicked, Odoo presents a pop-up window, wherein the user must confirm they want to delete the survey entirely, which they can do by clicking the Delete button at the bottom of the pop-up window.
Color: users can opt to choose a color to add to the survey line on the dashboard for added organizational purposes, if needed.
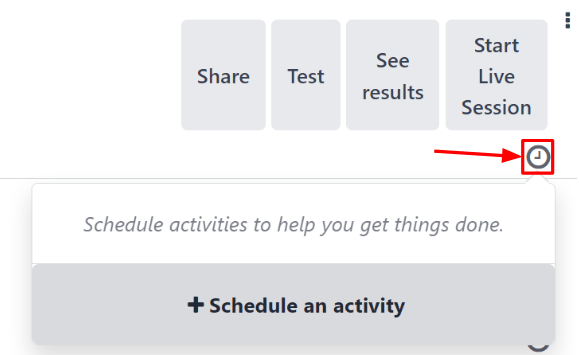
Beneath the buttons that are located to the far-right of the survey lines, there is an Activities button, represented by a 🕘 (clock) icon. When clicked, a mini pop-up window appears, from which activities related to that particular survey can be scheduled and customized.
列表视图
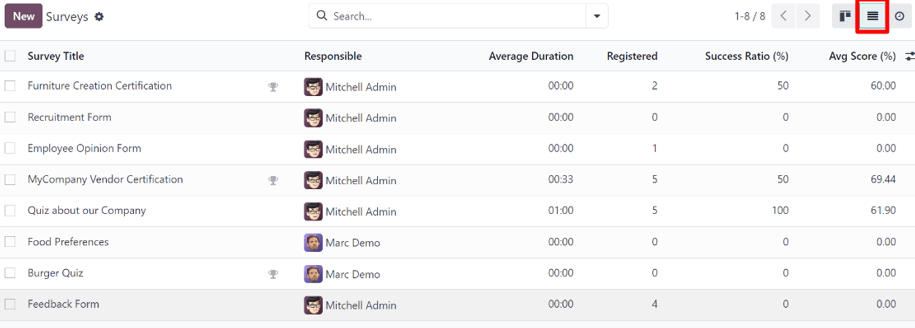
The Surveys dashboard is shown in the Kanban view, by default, but there is also a list view option available in the upper-right corner, represented by a ≣ (bars) icon.
When the ≣ (bars) icon is clicked, the survey related data is displayed in a list view.
The columns shown on the Surveys app dashboard, while in list view, are as follows:
Survey Title
Responsible
Average Duration
Registered
Success Ratio (%)
Avg Score (%)
小技巧
Additional columns can be added to the Surveys application dashboard, while in list view, by clicking the additional options drop-down menu, located to the far-right of the column titles, represented by a (slider with two dots) icon.
Activities view
To have the Surveys application dashboard display nothing but the activities associated to the surveys in the database, click the 🕘 (clock) icon to the far-right of the other view options, located in the upper-right corner.
Doing so reveals a table with rows and columns. The rows show the different surveys in the database, and the columns depict the various activity types.
注解
A new survey cannot be created in this view, as it is solely for the purpose of creating and viewing scheduled activities.
Create surveys
Learn about all the different options and configurations that can be utilized when creating a survey in Odoo.
另请参阅
评分调查
Discover how to measure a survey participant’s performance, or overall satisfaction, with Odoo’s detailed (and fully customizable) survey scoring options.
另请参阅
创建问题
With Odoo Surveys, there are many question types and options to choose from, providing the ability to create any kind of unique survey, questionnarire, and/or certification.
另请参阅
Live Session surveys
The Live Session survey option available in Odoo can enhance in-person demonstrations and presentations, where participants’ real-time responses can be used to dictate where the conversation goes next.
Survey analysis
Once the surveys start to come in, it is time to analyze the responses from your participants. Fortuantely, the in-depth reporting pages and options available in Odoo Surveys provide countless ways to examine everything related to surveys, and their submitted responses.
另请参阅