Master production schedule

In Odoo’s Manufacturing app, the master production schedule (MPS) is used to manually plan manufacturing orders (MOs) and purchase orders (POs), based on forecasted quantities of products and components.

By considering the impact of confirmed MOs and POs, along with manually adjusted demand forecasts, the MPS can be used to manage long-term product replenishment. This ensures the continued availability of the necessary products and components.

Since the MPS allows for manual intervention, it is useful for replenishing products where the demand of existing sales orders (SOs) does not reflect probable future demand.

Example

A retail store sells artificial Christmas trees during the holiday season. It is currently September, and the store has less than ten Christmas tree MOs confirmed for the month of December.

Despite the number of confirmed MOs, the procurement manager knows that the demand for Christmas trees in December is going to be much higher, once the holiday season starts. As a result, they manually enter a greater demand in the MPS, so they can properly replenish the product in time for the increase in customer demand.

重要

It is essential to remember that the MPS is a MANUAL tool. Adding a product to the MPS does not cause it to be manufactured or purchased automatically. The MPS simply suggests the amount of the product that should be replenished, but requires user input to create the MOs or POs that are used to replenish it.

For this reason, it is recommended that the MPS NOT be used alongside reordering rules for the same product. Because reordering rules are an automated workflow, they conflict with the manual replenishment method of MPS. Using both, in unison, can lead to inaccurate forecasts and the creation of unnecessary replenishment orders.

Enable and configure MPS

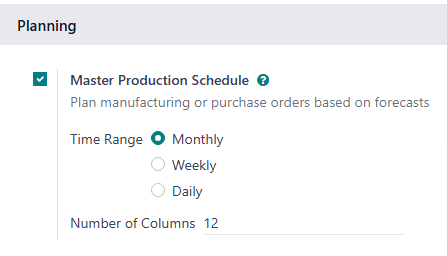
To use the MPS feature, navigate to Manufacturing app ‣ Configuration ‣ Settings, and tick the Master Production Schedule checkbox in the Planning section. Finally, click Save.

After enabling the Master Production Schedule feature, two new fields appear under it on the Settings page: Time Range and Number of Columns.

The Time Range field is used to select the period of time over which planning takes place, and offers three options: Monthly, Weekly, and Daily. For example, if Monthly is selected, the MPS plans the production requirements of products and components on a monthly basis.

The Number of Columns field is used to specify the quantity of the selected Time Range units shown on the MPS page. For example, if the Time Range field is set to Monthly, and 12 is entered in the Number of Columns field, the MPS shows one column for the next 12 months, starting with the current month.

If the values of the Time Range or Number of Columns fields are altered, click Save again to save the changes.

The MPS setting in the Manufacturing app's settings.

MPS dashboard

To open the MPS, navigate to Manufacturing app ‣ Planning ‣ Master Production Schedule. The MPS view appears as follows:

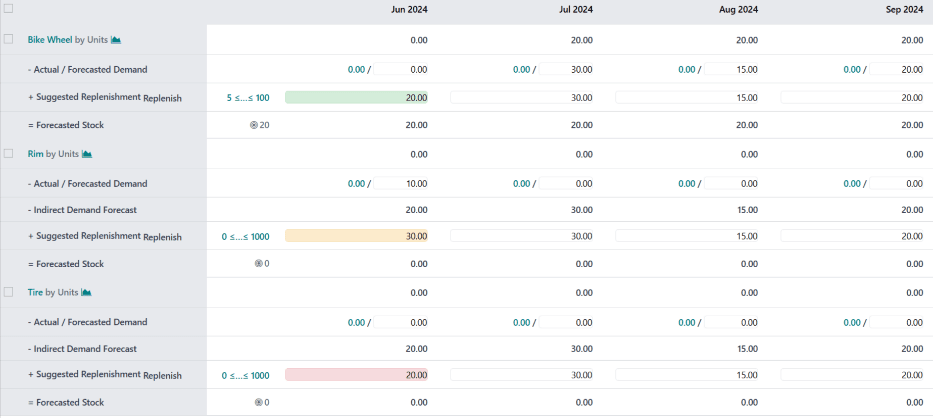
The Master Production Schedule in the Manufacturing app.

The grey column on the left side of the screen shows a section for every product added to the MPS, with each product section being broken down into smaller rows. The information shown in the rows depends on the filters selected in the Search… bar drop-down menu at the top of the page. The default categories that appear in the rows are:

  • [Product] by [unit] : the forecasted stock quantity at the beginning of each time period. [Product] and are selectable buttons which open the product’s page, or the forecast report for the product, respectively.

  • - Forecasted Demand: the demand forecast, which is entered manually. This represents an estimate of the demand for the product during each time period.

  • - Indirect Demand Forecast: while this is a default category, it only appears for products that are components of other products. It represents the demand for the component from existing MOs.

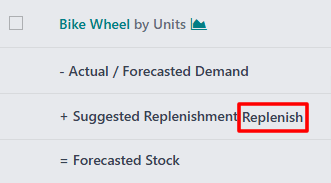
  • + Suggested Replenishment: the quantity of the product that is suggested to be replenished through MOs or POs. To the right of the category title is a Replenish button, which is used to manually replenish the product, based on the quantity suggested to be replenished.

    The Replenish button on the "+ Suggested Replenishment" row.

    The “Replenish” button on the “+ Suggested Replenishment” row.

  • = Forecasted Stock: the quantity of the product forecasted to be in stock at the end of each time period, assuming that suggested replenishment numbers are fulfilled.

Altogether, these default categories form an equation:

\[\text{Forecasted Demand} + \text{Suggested Replenishment} = \text{Forecasted Stock}\]

In the case of components, the Indirect Demand Forecast is taken into account as well.

The - Forecasted Demand and + Suggested Replenishment fields can be edited for any of the time periods to the right of the product column. Doing so changes the equation, and updates the value displayed in the Forecasted Stock field.

Changing the value in the + Suggested Replenishment field also makes an (reset) button appear to the left of the field. Click the (reset) button next to the field to reset its value back to the one calculated by the MPS.

重要

While the MPS can be used with only the default categories enabled, it is advisable to also enable the Actual Demand category. This is done by clicking the (down arrow) on the right side of the Search… bar, and enabling the Actual Demand option under the Rows header.

With the Actual Demand option enabled, the - Forecasted Demand category changes to the - Actual / Forecasted Demand category. In addition to the manually entered forecasted demand, this category also displays the confirmed demand for the product, which is based on confirmed SOs.

Each column to the right of the products column lists one unit of the time period selected in the Time Range field on the Manufacturing app Settings page (ex. months). The number of time period columns corresponds to the value entered in the Number of Columns field.

The first time period column represents the current time period. For example, if the MPS is configured to use months, the first column displays data for the current month. On this first column, the + Suggested Replenishment field appears in one of five colors:

  • Green: a replenishment order must be generated to keep stock at the Safety Stock Target.

  • Gray: a replenishment order has already been generated to keep stock at the Safety Stock Target.

  • Yellow: a replenishment order has already been generated, but the quantity it was created for is not enough to keep stock at the Safety Stock Target.

  • Red: a replenishment order has already been generated, but the quantity it was created for puts the amount of stock above the Safety Stock Target.

The + Suggested Replenishment field appears white, if no replenishment order has been generated, and it is not necessary to generate one at the current moment.

添加产品

To use MPS to manage the replenishment of a product, navigate to Manufacturing app ‣ Planning ‣ Master Production Schedule. At the top of the MPS page, click Add a Product to open the Add a Product pop-up window.

重要

Products must be properly configured to be replenished through the MPS.

In the case of manufactured products, the Manufacture route must be selected in the Routes section of the Inventory tab, on the product’s form.

In the case of products that are purchased, the Buy route must be selected in the Routes section of the Inventory tab, on the product’s form. Additionally, a vendor and the price they sell the product for must also be specified on the Purchase tab.

On the pop-up window, select the product to add in the Product drop-down menu. If the product is replenished through manufacturing, select the product’s BoM in the Bill of Materials field.

注解

Selecting a BoM when adding a product to the MPS also adds any components listed on the BoM. If it is not necessary to manage the replenishment of components through the MPS, simply leave the Bill of Materials field blank.

If the database is configured with multiple warehouses, a Production Warehouse field appears on the Add a Product pop-up window. Use this field to specify which warehouse the product is replenished to.

In the Safety Stock Target field, specify the minimum quantity of the product that should be kept available for orders at all times. For example, if there should always be 20 units of the product available for order fulfillment, enter 20 in the Safety Stock Target field.

In the Minimum to Replenish field, enter the minimum product quantity for orders created to replenish the product. For example, if 5 is entered in this field, replenishment orders for the product include a minimum of five units.

In the Maximum to Replenish field, enter the maximum product quantity for orders created to replenish the product. For example, if 100 is entered in this field, replenishment orders for the product include a maximum of 100 units.

Finally, click Save to add the product to the MPS. The product now appears on the MPS page each time it is opened. If a BoM was selected in the Bill of Materials field of the Add a Product pop-up window, any components listed on the BoM appear on the page, as well.

The Add a Product pop-up window in the MPS.

Edit a product

After adding a product to the MPS, it may be necessary to change the replenishment values entered on the Add a Product pop-up window. To do so, click the # ≤…≤ # button to the immediate right of the Replenish button, on the + Suggested Replenishment row, below the product’s name.

注解

The first and second number displayed on the # ≤…≤ # button correspond to the values entered in the Minimum to Replenish and Maximum to Replenish fields when adding the product to the MPS.

For example, if 5 was entered in the Minimum to Replenish field, and 100 was entered in the Maximum to Replenish field, the button appears as 5 ≤…≤ 100.

Clicking the # ≤…≤ # button opens the Edit Production Schedule pop-up window. This pop-up window is the same as the Add a Product pop-up window, except that the Product and Bill of Materials fields cannot be edited.

On the Edit Production Schedule pop-up window, enter the desired values in the Safety Stock Target, Minimum to Replenish, and Maximum to Replenish fields. Then, click Save to save the changes.

Remove a product

To remove a product from the MPS, tick the checkbox to the left of its name. Then, click the Actions button at the top of the screen, and select Delete from the resulting drop-down menu. Finally, click Ok on the Confirmation pop-up window.

Deleting a product from the MPS removes it, along with all of its data. If the product is re-added, its replenishment values must be reconfigured.

MPS replenishment

Products in the MPS can be replenished in one of three ways:

  • Click the Replenish button at the top of the screen to generate replenishment orders for every product below its Safety Stock Target for the current month.

  • Click the Replenish button on the right side of the + Suggested Replenishment row of a specific product, to generate a replenishment order for that specific product.

  • Tick the checkbox to the left of the product name of one or more products. Then, click the Actions button at the top of the screen, and select Replenish from the resulting drop-down menu. Doing so generates a replenishment order for each selected product.

The type of replenishment order generated corresponds to the route selected on the Inventory tab of the product’s form:

  • If the Buy route is selected, an RfQ is generated to replenish the product. RfQs can be selected by navigating to the Purchase app. Any RfQ generated by the MPS lists MPS in its Source Document field.

  • If the Manufacture route is selected, an MO is generated to replenish the product. MOs can be selected by navigating to Manufacturing app ‣ Operations ‣ Manufacturing Orders. Any MO generated by the MPS lists MPS in its Source Document field.