Lost leads reactivation email

In Odoo, lost leads are removed from the active CRM pipeline, but can still be targeted with the Email Marketing application for strategic campaign purposes, such as lost leads reactivation.

A lost leads reactivation email looks at the leads that were lost during a specific period of time, and uses custom filters and lost reasons to exclude undesirable leads from the mailing list.

Once a lost leads reactivation email is complete, it can be sent as is, modified and sent to different groups for A/B testing, or saved as a template for later.

Example

A warehouse has leftover merchandise from a limited run of items from last year. To help clear out the excess inventory, the warehouse manager creates a lost leads email to reach out to old opportunities that were lost, and inform them that the limited merchandise is back in stock.

The warehouse manager uses the following filters for a lost leads email:

  • Blacklist is not set

  • Created on >= 01/01/2024 00:00:01

  • Stage is not in New, Qualified, or Won

  • Lost Reason is in Not enough stock

  • and either Active is set or not set

A lost leads reactivation filter list excluding lost reasons like Too Expensive.

小技巧

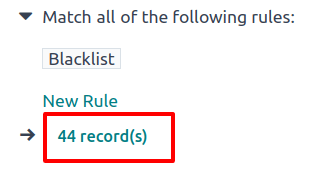
As filters are added and removed, pay attention to the # record(s) value below the filtering section. This value indicates the total number of records that match the current criteria.

To view a list of all matching records, click the # record(s) text.

The # record(s) text is located below the list of Recipient filters.

Minimum requirements

In order to create and deliver a lost leads reactivation email campaign, the CRM and Email Marketing applications must be installed and configured.

Here are the minimum necessary filters that pertain to a lost leads reactivation mailing campaign:

  • The Recipients field must be set to the Lead/Opportunity model.

  • A Blacklist filter to exclude unsubscribed recipients.

  • A Created on to target leads that were lost during a specific period of time.

  • Stage filter(s) to exclude leads that were already won, or are still active in new stages of the sales pipeline (i.e. New, Qualified, etc.). These values will be different per organization; however, it’s minimally viable to exclude all the leads in the Won stage.

  • One or more Lost Reason filters to exclude undesired leads, such as duplicate, spam, or irrelevant records.

  • A pair of Active filters to target both active and inactive leads.

Add the necessary filters

First, navigate to the Email Marketing app, and on the Mailings page, click the New button in the top-left corner.

On the new Mailings form, enter an appropriate Subject line for the email in the corresponding field. Then, in the Recipients field, choose the Lead/Opportunity model from the drop-down menu.

In the rules section, located beneath the Recipients field, click the modify filter (▶ (triangle pointing right)) icon to expand the filter rules. Leave the default Blacklist rule in place.

创建于

Begin by clicking New Rule beneath the default Blacklist rule. Then, click the first field of the new rule that appears, and select the Created on parameter from the drop-down menu. With that in place, a specific time period during which the targeted leads were lost can be designated (e.g. 30 days prior, 90 days prior, previous year, etc.).

Then, in the second field, select <= (less than or equal to), >= (greater than or equal to), or is between as a date operator, in order to frame the time selection chosen in the third field.

In the third field, use the calendar popover window to select dates, and click Apply to lock in the time range.

A custom filter rule setting the time period to be anything before today's date.

重要

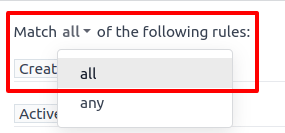
When there is more than one rule applied, make sure the statement at the top of the Recipients filter list reads: Match all of the following rules. If it does not, click on the statement, and select all from the drop-down menu (as opposed to any).

The statement at the top of the filters list, with the drop-down menu open.

阶段

Now, add the Stage filter to exclude leads that are in the New, Qualified, and Won stages of the sales pipeline.

注解

This step assumes that the New, Qualified, and Won stages exist in the CRM pipeline; however, stage names may differ from business to business. Refer to the database’s actual stage names in the CRM app’s pipeline to complete this step, accordingly.

Begin again by clicking New Rule and select Stage from the first field’s drop-down menu. In the second field, select the is not in operator, and in the third field, select the New, Qualified and Won stages to define the rule’s parameters.

When the rule is added in this way, the logic in the third field renders as OR (|) statements.

Include multiple Stages in the filtering rule, using the "is in" operator.

小技巧

Another way to add Stage rules, is to do so on a one-rule-per-row basis using the contains or does not contain operators, and manually typing out the defining characters in each stage name. This method, however, only allows for one selection at a time, which can be useful for quickly turning on/off filters in the Search… bar.

Three filter rules requiring that the Stage does not contain New, Qualified, or Won.

丢失原因

Next, add one or more Lost Reason rules to exclude leads that should not be targeted for specific lost reasons.

To do that, create another New Rule, once again. Then, in the rule’s first field, select Lost Reason from the drop-down menu. For the operator, choose either is not in or does not contain from the drop-down menu. With either selection, use the third field to enter a lost reason (or multiple lost reasons, depending on your operator choice) to include in the rule.

If choosing the does not contain operator, then repeat the preceding steps to add more lost reasons, as needed, where each lost reason occupies one rule row at a time.

For more information, refer to the section below outlining how to select appropriate lost reasons.

A list of filter rules that exclude all lost reasons other than the desired reason.

激活

Finally, add a pair of Active filters to include both active and inactive leads for the campaign.

重要

Adding both active and inactive lead records is necessary to capture the full scope of lost leads in the database. Doing one without the other greatly impacts the number of targetable records for the email campaign, and does not include a complete or accurate lost leads audience.

First, click the (Add Branch) icon on the most recently created rule (e.g. Lost Reason), which is the middle of three icons located to the right of the rule row. Doing so adds a pair of any of rules. Then, in the top rule’s first field of the newly-created branch, select the Active parameter from the drop-down menu. The rule then automatically fills out to read: Active is set.

For the first field of the bottom rule of the branch, select Active from the drop-down menu again. However, this time, select is not from the operator drop-down menu in the second field. The rule should then read: Active is not set.

A pair of Match Any Of filter rules that include both active and inactive leads.

Add body content

Now, with the domain section of the email campaign complete, create the body content of the email using any of the premade stylized templates, or choose between the Plain Text or Start From Scratch options for more granular control. For more information, refer to the Email Marketing documentation on how to create an email.

小技巧

To save the set of filters for later use, click Save as Favorite Filter 💾 (floppy disk), enter a name (such as Lost Leads), and click Add.

The Save as Favorite Filter pop-up can save the lost leads criteria for later.

Send or schedule

Once all the components of the email campaign are complete, either:

  • click the purple Send button at the top-left of the form to immediately send the email; or

  • click the gray Schedule button, located to the right of the Send button, to send the email at a future date and time.

小技巧

Consider using A/B Testing to send an alternate version of the email to a percentage of the target leads. This can help determine what subject lines and body content produce the best click-through rates, before sending a final version to the remaining leads.

To do so, open the A/B Tests tab on the mailing form and check the box next to Allow A/B Testing. Then, adjust the parameters as needed, and click Create an Alternative Version.

The A/B Tests tab with the Allow A/B Testing box checked to create an alternate version.

Select appropriate lost reasons

When a lead is marked as lost, Odoo recommends selecting a Lost Reason to indicate why the opportunity did not result in a sale. Doing so keeps the pipeline organized and reporting data accurate, and generates potential to follow up with the lead in the future.

If an existing Lost Reason is not applicable, users with the necessary permissions can create new ones, which means the lost reasons in a database can vary from organization to organization, and from pipeline to pipeline.

For more information on Lost Reasons, including the creation of them, refer to 管理失去的机会.

By default, Odoo includes a few common Lost Reasons, such as:

  • Too expensive

  • We don’t have people/skills

  • Not enough stock

When determining which reasons to include in a lost leads reactivation email, consider what the email is advertising, in order pinpoint one or more relevant lost reasons. Then, add a rule stating, Lost Reason does not contain _____ for every reason in the database, except for the relevant one(s).

Example

If the email advertises a selection of previously-limited merchandise that is now back in stock, it makes sense to target leads with the lost reason: not enough stock.

A list of filter rules that exclude all lost reasons except for Out of Stock.

If the email advertises a price reduction, it makes sense to target leads with the lost reason: too expensive.

A list of filter rules that exclude all lost reasons except for Too Expensive.

Analyze the results

After sending a lost leads reactivation email, marketing teams can use the smart buttons along the top of the email to analyze the results, and determine follow-up actions.

Clicking on any of the smart buttons opens a list of records matching that button’s specific criteria.

The Mailing page of a sent email showing the smart buttons along the top of the page.

The smart buttons include:

  • Sent: total number of emails sent.

  • Opened: percentage of recipients that opened the email.

  • Replied: percentage of recipients that replied to the email.

  • Clicked: click-through rate (%) of recipients that clicked on a link in the email.

  • Leads/Opportunities: number of leads (or opportunities) that have been created in the CRM pipeline, as a result of the email campaign.

  • Quotations: number of quotations that have been created in the Sales application, as a result of the email.

  • Invoiced: total revenues generated, as a result of the email campaign, via invoices sent to, and paid by, customers. These values are recorded in either the Invoicing or Accounting application, depending on which app is installed in the database.

  • Received: percentage of recipients that received the email.

  • Bounced: percentage of emails that bounced (not delivered).

  • Ignored: the number of recipients that received the email, but have not interacted with it in a meaningful way (i.e. opened, clicked, etc.).

Email nurturing

Email nurturing (sometimes referred to as lead nurturing) is the process of sending a series of timely and relevant “nudge” emails to connect with a lead, build a deeper relationship, and ultimately convert the lead into a sale.

The point of nurturing is to keep the email campaign “visible” or at the top of a lead’s inbox, until they are ready to buy.

There are many approaches to effective lead nurturing, but they often involve:

  • Sending an initial email (such as, a lost leads reactivation email).

  • Sending a follow-up email each week (or according to specific triggers) for the duration of the campaign.

  • Continuously analyzing results to learn what approaches have resulted in sales.

  • Continuously adjusting the approach to remain “visible” at the top of the lead’s inbox, and hopefully, get a meaningful response from the lead.

As a campaign progresses, a marketing team may send different follow-up emails depending on how a lead responded the previous week.

Example

A marketing team wants to advertise a restocking of limited-run merchandise to all leads with a lost reason of not enough stock. They develop the following three-week long lead nurturing campaign.

  • Week 1: the marketing team sends an initial email, with the subject line: “Limited run merchandise is back in stock! Act now!”

  • Week 2: the marketing team sends two different emails, depending on how a lead responded.

    • If a lead ignored the Week 1 email: “Stock is almost out, did you get yours?”

    • If a lead clicked on the Week 1 email: “You still have time to add this to your collection”

  • Week 3: the marketing team sends a final email to all leads who have not been converted stating: “20% off, don’t miss your last chance to get these items before they’re gone!”

Throughout the campaign, the marketing team continuously refers to the smart buttons along the top of the mailing page to see what percentages of leads are opening, clicking on, or ignoring the emails. They also regularly analyze reports on how many opportunities, quotations, and invoices have been generated by the campaign.