签名
Odoo Sign 允许您通过电子签名在线发送、签署和批准文档。
一个 电子签名 表示一个人对文件内容的同意。就像手写签名一样,电子签名也代表了签署人对所签文件条款的法律约束。
使用 Sign,您可以上传任何 PDF 文件并在其上添加字段。这些字段可以使用您数据库中用户的详细信息自动填写。
电子签名的有效性
通过 Sign 应用签署的文件在欧洲联盟和美利坚合众国具有有效的电子签名法律效力。它们也符合大多数国家对电子签名的要求。Odoo 生成的电子签名的法律效力取决于您所在国家的法律法规。在海外开展业务的公司还应考虑其他国家的电子签名法规。
重要
以下信息不具有法律效力;仅用于一般性信息参考。由于规范电子签名的法律法规迅速变化,我们无法保证所有信息均为最新。我们建议就电子签名的合规性和有效性问题咨询当地律师。
欧盟
eIDAS 法规 为 欧盟27个成员国 中的电子签名建立了框架。它区分了三种类型的电子签名:
简单的电子签名
高级电子签名
合格的电子签名
Odoo 生成第一种类型,简单电子签名;根据 eIDAS 法规,这些签名在欧盟具有法律效力。
电子签名可能不会被自动识别为有效。您可能需要提供证明签名有效性的相关证据。虽然“Sign”应用提供了简单的电子签名,但在签名过程中会自动收集一些支持性证据,例如:
电子邮件和短信验证(如果已启用)
通过 itsme® 进行强身份验证(在比利时和荷兰可用)
带有时间戳、IP 地址和地理定位的文档及其相关签名的访问日志
文档可追溯性与不可篡改性(Odoo通过使用密码学证明检测对已签署文档的任何修改)
注解
美利坚合众国
The ESIGN Act (Electronic Signatures in Global and National Commerce Act), at the interstate and international levels, and the UETA (Uniform Electronic Transactions Act), at the state level, provide the legal framework for electronic signatures. Note that Illinois and New York have not adopted the UETA, but similar acts instead.
总体而言,要被认定为有效,电子签名必须满足五个条件:
签署人必须表现出明确的**签署意图**。例如,使用鼠标绘制签名可以表明意图。签署人还必须有选择退出电子文件的选项。
签署人必须首先明确或暗示其**同意以电子方式开展业务**。
签名必须明确归属。在 Odoo 中,会将元数据(如签名人的 IP 地址)添加到签名中,这些信息可以作为支持性证据。
签名必须与签署的文档相关联,例如,通过记录详细说明签名是如何获取的。
电子签名的文件需要所有相关方**保留和存储**;例如,可以向签署人提供一份已签署的完整副本,或提供下载副本的权限。
其他国家
发送文件进行签署
一次性签名
你可以从仪表盘点击 上传 PDF 进行签名 进行一次性签名。选择你的文档,打开它,并将所需的 字段 拖放到文档中。你可以通过点击某个字段并选择你想要的选项来修改该字段分配的 角色。
准备好后,点击 发送,并填写必填字段。发送后,您的文档将保持可用。转到 以查看您的文档及签名状态。
有效日期和提醒
您可以为有限期限的协议文档设置**有效日期**,或发送**自动电子邮件提醒**以按时获取签名。从您的仪表板中,点击文档上的 发送。在新页面上,进入 选项 部分,填写 有效至 字段,打开 提醒 开关,并点击该值以编辑提醒之间的默认天数。

模板
您可以创建文档模板,以便多次发送相同的文档。从您的仪表板出发,点击 上传 PDF 模板。选择文档并添加所需的 字段。您可以通过单击字段并选择所需的内容来修改 角色。
点击 模板属性 以向您的模板添加 标签,定义 签署文档工作区,添加 签署文档标签,设置一个在签名确认消息中可用的 重定向链接,或者如果您希望将模板的使用限制为特定授权用户或组,则可以定义 授权用户。
您的模板默认在仪表盘上可见。您可以点击 发送 快速将文档模板发送给签署人,或在您准备好立即签署文档时点击 现在签署。
小技巧
你可以 从之前发送过的文档创建模板。要执行此操作,请转到 。在你想要恢复的文档上,点击右侧的垂直省略号 (⋮),然后选择 模板。再次点击垂直省略号 (⋮),然后选择 恢复。现在,你的文档会出现在你的仪表盘上,与其他模板并列显示。
角色
每个签名文档中的字段都对应一个特定人员的角色。当文档正在被签署时,分配到该角色的人员必须填写其对应的字段并进行签名。
角色可通过进入 进行设置。
可以通过点击 新建 来更新现有角色或创建新角色。选择一个 角色名称,添加一个 额外验证步骤 以确认签署人的身份,并且如果文档可以重新分配给其他联系人,请为该角色选择 更改授权人。还可以为该角色选择一个 颜色。此颜色有助于在配置模板时了解哪些角色负责哪些字段。
安全身份验证
作为文档的所有者,您可以通过 短信验证 或通过 Itsme® <sign/itsme>`(仅在比利时和荷兰可用)请求一个 :guilabel:`额外的身份验证步骤。这两种身份验证方式都需要 积分。如果您已没有剩余积分,则会跳过身份验证步骤。
另请参见
短信验证
转到 。点击角色的 额外认证步骤 列,然后选择 通过短信的唯一代码。
注解
在能够发送短信之前,您需要注册您的手机号码。操作方法是:进入 ,然后在 通过短信验证 下点击 购买积分。
前往需要签名的文档,添加需要短信验证的字段,例如 签名 字段,然后点击 发送。在新页面中,选择 客户,然后点击 发送。
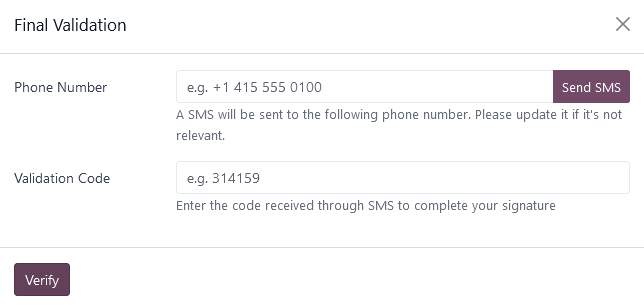
签署文件的人员填写 签名 字段,然后点击 签署,并单击 验证并发送已完成的文件。将弹出一个 最终验证 页面,用于输入他们的电话号码。一次性验证码将通过短信发送。
注解
此功能默认已启用。
一旦 额外认证步骤 应用于某个角色,那么对该角色分配的任何字段都将请求此验证步骤。
Itsme®
可以使用 itsme® 身份验证功能,允许签署人通过 itsme® 提供其身份信息。此功能仅在 比利时 和 荷兰 可用。
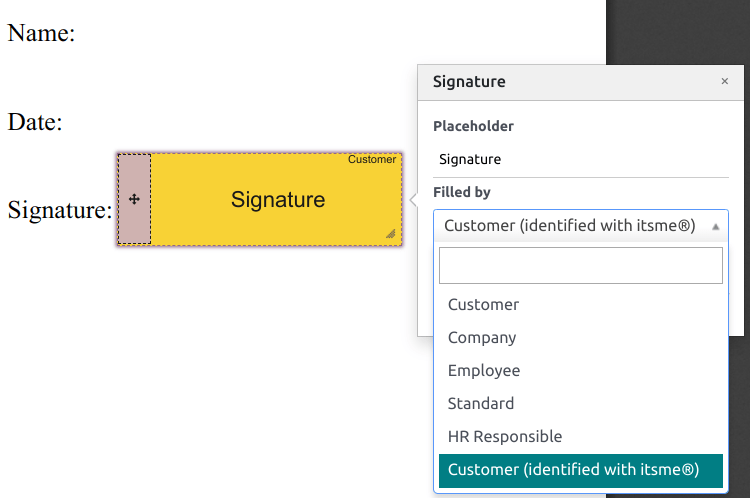
此功能可以在 签名设置 中启用,并会自动应用于 客户(通过 itsme® 识别) 角色。如需为其他角色启用此功能,请进入 。点击对应角色的 额外认证步骤 列,然后选择 通过 itsme®。
前往需要签名的文档并添加 签名 字段。切换到已配置该功能的角色,然后点击 验证 和 发送。
签署文件后,签名人填写 签名 字段,并通过点击 验证并发送已签署的文件 继续操作,这将触发一个 最终验证 页面,需要通过 itsme® 进行身份验证。
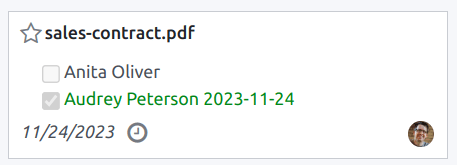
签署人哈希
每次有人签署文档时,都会生成一个 哈希值 —— 该操作的唯一数字签名 —— 以确保可追溯性、完整性和不可更改性。此过程保证了在签署之后进行的任何更改都可以被轻易检测到,从而在整个文档生命周期中保持文档的真实性和安全性。
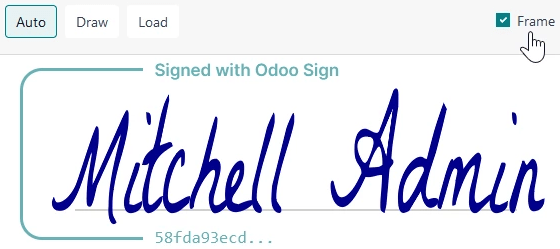
在签名中添加了一个显示哈希开始部分的可视化安全框架。内部用户可以在签署文档时通过开启或关闭 框架 选项来隐藏或显示该框架。
下单
当一份文件需要由不同方进行签署时,签署顺序可以让您控制接收人依次收到文件进行签署的顺序。
上传包含至少两个签名字段(且角色不同)的 PDF 后,点击 发送,切换 指定签署顺序 开关,并搜索签署人的姓名或电子邮件信息以添加他们。您可以通过在第一列输入 1 或 2 来决定签署顺序。

每个收件人只有在前一位收件人完成其操作后,才会收到签名请求通知。
字段类型
字段用于在文档中表明必须由签署人填写的信息。您可以通过将左侧栏中的字段拖放至您的文档中,轻松地为文档添加字段。
可以使用多种字段类型来签署文档(占位符、自动完成等)。通过配置您自己的字段类型,也称为签名项类型,可以使您的客户、合作伙伴和员工的签署过程更加高效。
要创建和编辑字段类型,请转到:。
你可以通过点击已有的字段进行选择,或者点击 创建 新建一个。首先,编辑 字段名称。然后,选择一个 字段类型:
签名:用户被要求通过绘制签名、根据其姓名生成一个自动生成的签名,或者上传本地文件(通常是图像)。每个后续的 签名 字段类型将重复使用第一个字段中输入的数据。
初始缩写:用户需要以类似于 签名 字段的方式输入自己的姓名缩写。
文本: 用户在单行中输入文本。
多行文本:用户可以在多行中输入文本。
复选框:用户可以勾选一个方框(例如,用于标记他们的批准或同意)。
选择: 用户从多种选项中选择一个。
该 自动填充业务伙伴字段 设置用于在签名过程中自动填写某个字段。它会使用签署文档人员的联系人(res.partner)模型中某一字段的值。为此,请输入联系人模型字段的技术名称。
小技巧
要了解字段的技术名称,请启用开发者模式,然后将鼠标悬停在字段旁边的问号上。
注解
已签名文件中建议填写的值可以由签署人根据需要进行修改。
可以通过编辑 默认宽度 和 默认高度 来更改字段的大小。这两个尺寸均以小数形式表示为整个页面的百分比,其中 1 表示整个页面的宽度或高度。默认情况下,您创建的新字段的宽度设置为整个页面宽度的 15%(0.150),而其高度设置为整个页面高度的 1.5%(0.015)。
接下来,编写一个 提示。提示在用户签署过程中会显示在屏幕左侧的箭头内,以帮助用户了解该步骤的内容(例如:“在此处签名”或“填写您的出生日期”)。您还可以使用 占位符 文本,在字段未填写时显示在字段中。
