故障排除
物联网盒子连接
无法找到配对码以连接物联网盒子
打印配对码应该在连接到收据打印机的 IoT 盒子上打印,并且还应该在连接的显示器上显示。
The pairing code does not show under the following circumstances:
The IoT box is already connected to an Odoo database.
The IoT box is not connected to the Internet.
The code is only valid for 5 minutes after the IoT box has started. It is automatically removed from connected displays when this time has expired.
The version of the IoT box image is too old. If the IoT box image is from an earlier version, then the SD card of the IoT box needs to be re-flashed to update the image (see Flashing the SD Card).
If none of the cases listed above correct the issue, then make sure the IoT box has correctly started, by checking that a fixed green LED is showing next to the power port.
IoT box is connected but it is not showing in the database
When an IoT box connects to a database, it may restart. If so, it can take up to five minutes before appearing in the database. If the IoT box is still not showing after five minutes, make sure that the IoT box can reach the database and that the server does not use a multi-database environment.
要从 IoT 盒子访问数据库,请打开浏览器并输入数据库地址。
IoT盒子已连接到Odoo数据库,但无法访问。
确保 IoT 盒子和运行浏览器的计算机位于同一网络上,因为 IoT 盒子无法从本地网络外部访问。
The HTTPS certificate does not generate
In order to generate a HTTPS certificate, an IoT box subscription is required for the IoT box. Connecting the IoT box prior to configuring an IoT subscription for the database and IoT box with the Account Manager will result in an unsecured connection.
此外,防火墙还可以阻止 HTTPS 证书的正确生成。在这种情况下,禁用防火墙,直到证书成功生成。还应注意,某些设备,如具有内置防火墙的路由器,可能会阻止 HTTPS 证书的生成。
另请参阅
打印机
打印机未被检测到
If a printer does not appear in the devices list, go to the IoT box homepage and make sure that it is listed under Printers.

If the printer is not present on the IoT box homepage, click Printers Server, go to the Administration tab and click on Add Printer. If the printer is not present in the list, it is likely not connected properly.
打印机输出随机文本
对于大多数打印机,应该会自动检测并选择正确的驱动程序。然而,在某些情况下,自动检测机制可能不足够,如果找不到驱动程序,打印机可能会打印出随机字符。
The solution is to manually select the corresponding driver. On the IoT box homepage, click on Printers Server, go to the Printers tab and select the printer in the list. In the Administration drop-down menu, click on Modify Printer. Follow the steps and select the make and model corresponding to the printer.
注解
Epson 和 Star 收据打印机以及 Zebra 标签打印机不需要驱动程序即可工作。请确保这些打印机未选择任何驱动程序。
Epson configuration special case
Most Epson printers support printing receipts in Odoo POS using the GS v 0
command. However, the following Epson printer models do not support this command:
TM-U220
TM-U230
TM-P60
TMP-P60II
Bypass this issue by configuring the printer to use the ESC * command instead.
Process to force ESC * command
Epson printer compatibility
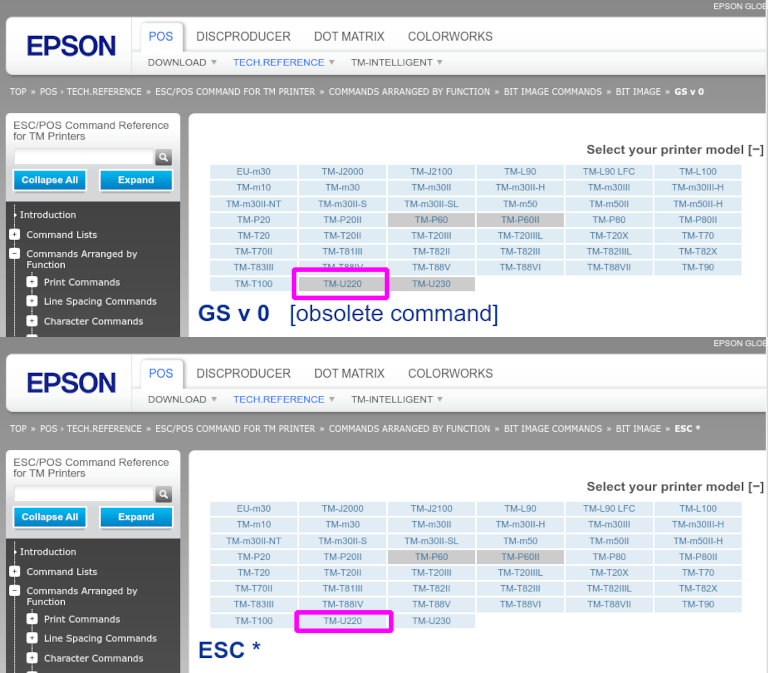
The first step is to check whether the printer is incompatible with GS v 0 command.
另请参阅
Epson GS v 0 documentation for
GS v 0compatible printers.Epson ESC * documentation for
ESC *compatible printers.
If the printer is not compatible with the ESC * command then the following process is not
possible. Should the printer be compatible to use the ESC * command to print, follow this process
to configure the printer with the IoT box.
IoT box configuration for ESC *
To configure the IoT box to use the ESC * command to print, go to the
IoT box homepage by navigating to . Then click on the IP address and this will direct to the IoT box homepage.
Choosing the printer
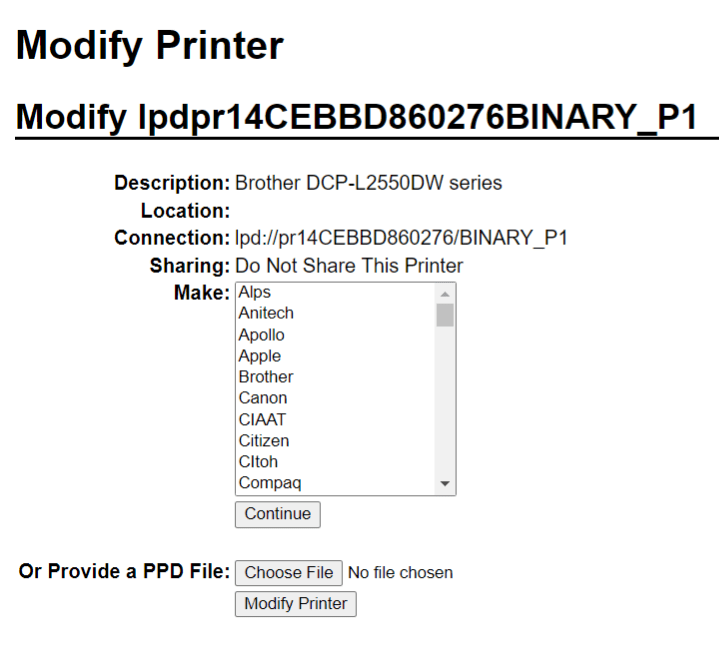
Now click on the Printers server button. This will redirect the browser to the CUPS page. Next, go to , choose the printer that should be modified, and then click Continue.
小技巧
If the name of the printer is still uncertain, take the following steps:
Take note of the listed printers on the CUPS page.
Turn the printer off and refresh the page.
Now compare the difference with the first list to see which printer disappeared.
Turn the printer back on and refresh the page again.
Double-check the list again to see if the printer re-appears.
The printer that disappeared and reappears again on the listed printers is the name of the printer in question.
注解
This can be Unknown under Local printers.
CUPS naming convention
CUPS will prompt the administrator for three pieces of information: the Name,
Description and the Location. The last two pieces of information do not need
to be specific, however, the Name should follow a particular convention to work with the
ESC * command.
The Name should match this convention:
<printer_name>__IMC_<param_1>_<param_2>_..._<param_n>__
A breakdown of the naming convention:
printer_name: This is the printer name. It can be any character as long as it does not contain_,/,#, or ` ` (space character).IMC: This stands for Image Mode Column (the simplified name forESC *).param_1: This stands for the specific parameter:SCALE<X>: Scale of the picture (with the same aspect ratio).Xshould be an integer describing the scale percentage that should be used.Example
100is the original size,50is half the size,200is twice the size.LDV: Low Density Vertical (will be set to High Density Vertical if not specified).LDH: Low Density Horizontal (will be set to High Density Horizontal if not specified).注解
Density parameters might need to be configured in a particular way depending on the printer model.
另请参阅
Visit Epson’s ESC * documentation and click on the printer model printer in the table above to see if the printer should set these parameters.
Example
The following are examples of proper and improper name formatting:
Proper name formatting:
EPSONTMm30II__IMC__EPSON_TM_U220__IMC_LDV_LDH_SCALE80__
Improper name formatting (this will not prevent printing, but the result might not have the expected printed output):
EPSON TMm 30II-> The name cannot have spaces.EPSONTMm30II-> The name itself is correct, but it will not useESC *.EPSONTMm30II__IMC-> This name is missing the end__.EPSONTMm30II__IMC_XDV__-> The parameterXDVdoes not match any existing parameters.EPSONTMm30II__IMC_SCALE__-> The parameterSCALEis missing the scale value.
Finish adding a printer
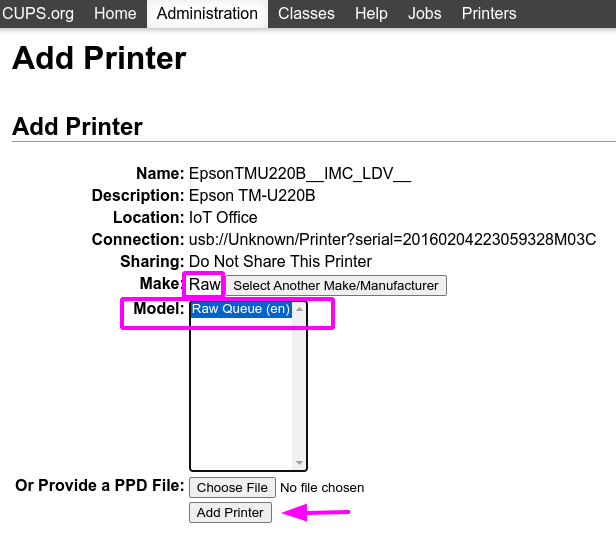
After setting the name of the printer with the appropriate naming convention, click Continue. Next, set the Make value to Raw and for the Model value, set this to Raw Queue (en).
After completing these steps, click Add Printer. If everything was done correctly, the page should redirect to the Banners page.
At this point the printer should have been created, now the IoT box just needs to detect it and then sync to Odoo’s server (this could take a few minutes).
Adding the printer to Odoo PoS
Once the printer is visible on the Odoo database, do not forget to choose it in the PoS printer. Navigate to .
注解
If the printer was set up incorrectly (it is still printing random text or the printed receipt is too big or small), then it cannot be modified via the printer name with CUPS. Instead, the above process can be repeated to set up another printer from scratch to create one with modified parameters.
Example setup of the Epson TM-U220B printer using ESC
The following is an example of the troubleshooting process for a TM-U220B printer model using the
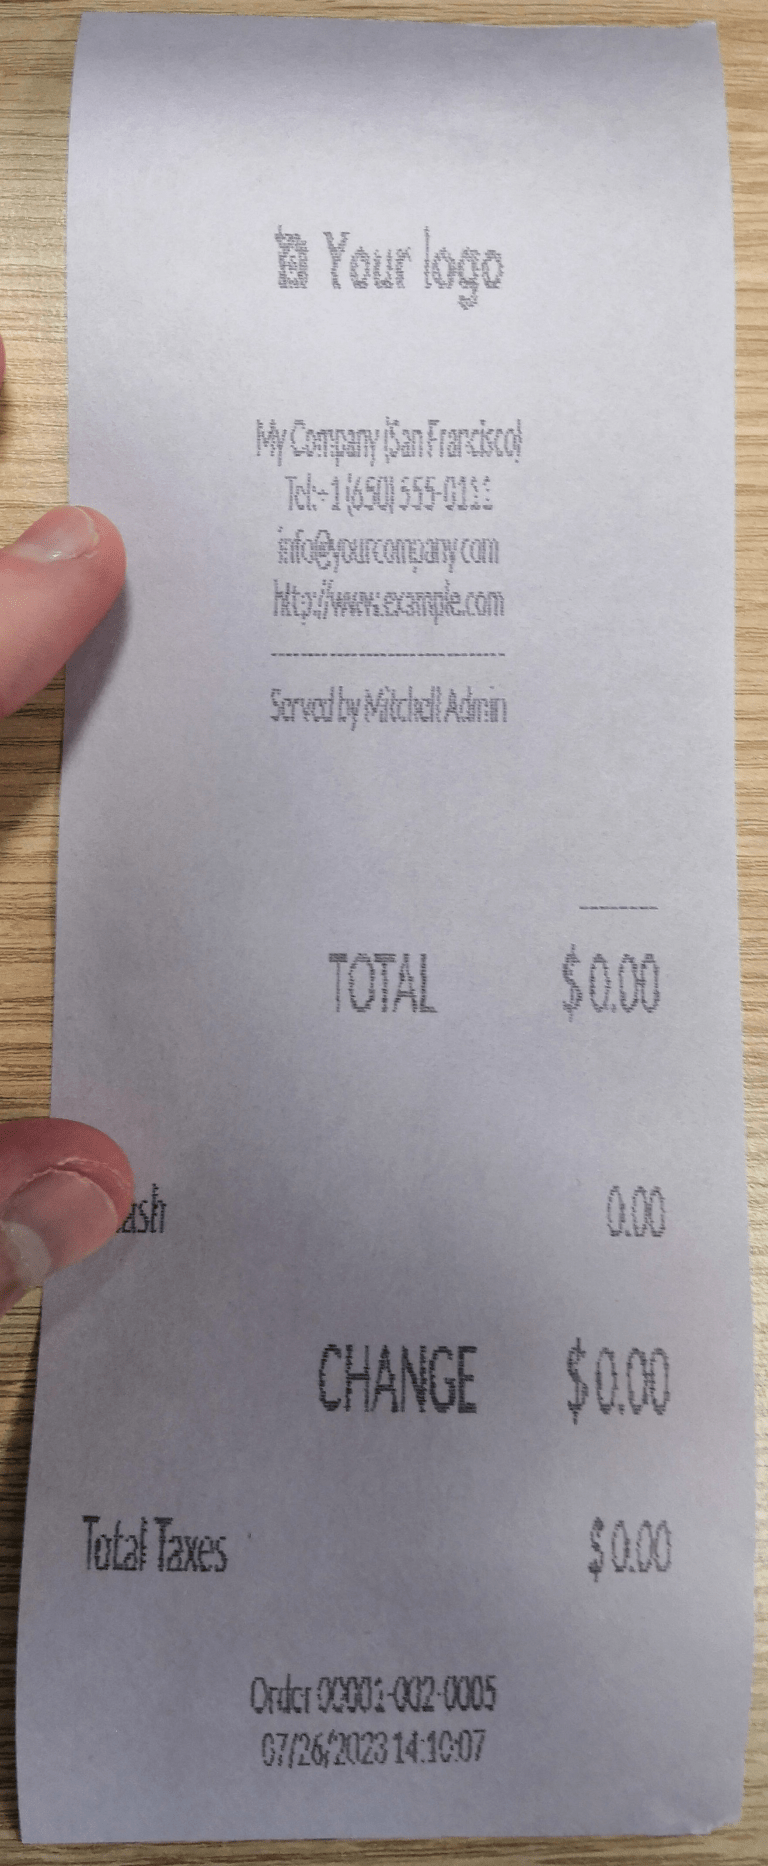
ESC * command. The receipt pictured below is an example of a receipt that is printing correctly
due to proper formatting (in theory):
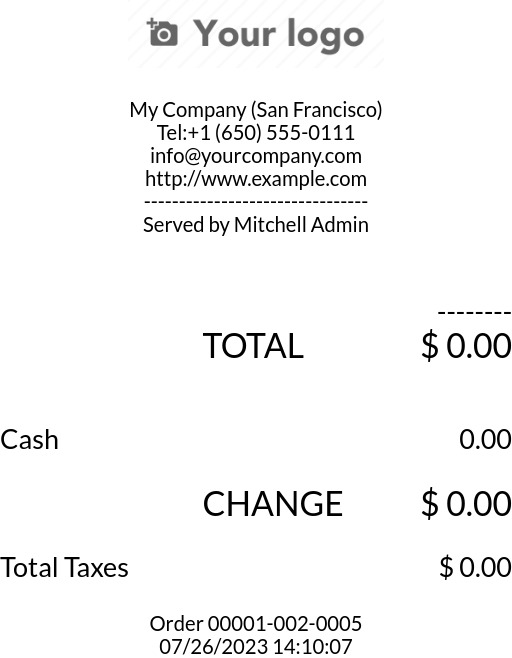
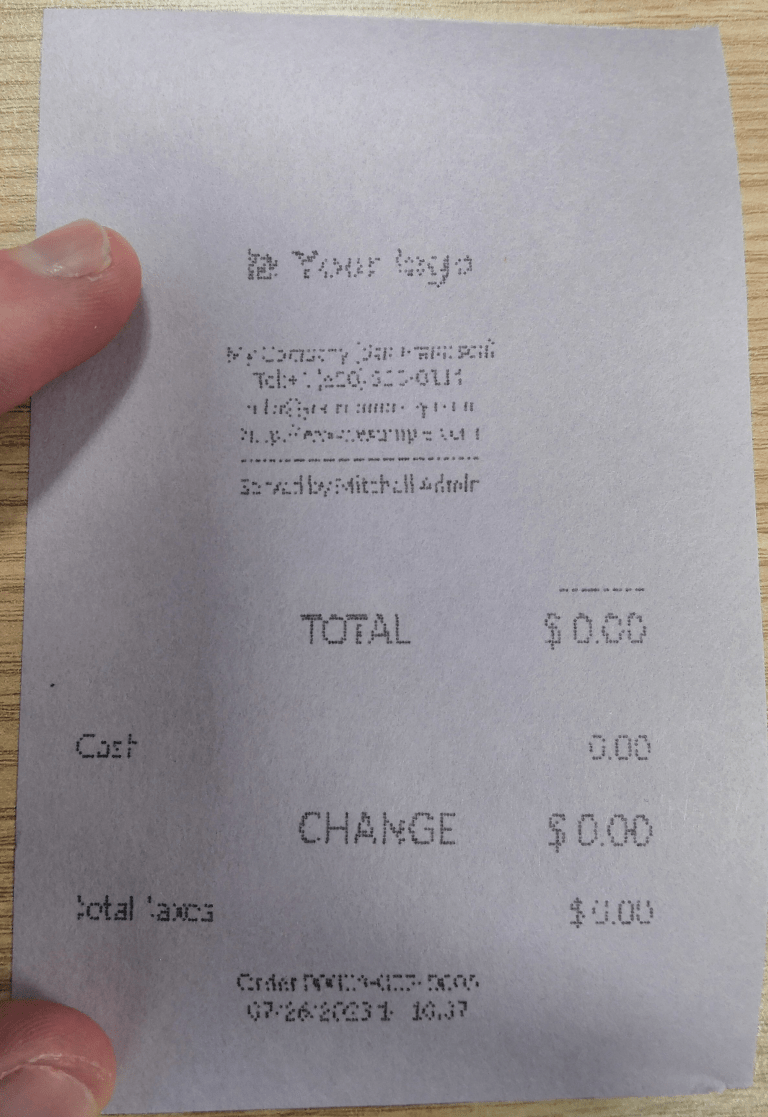
Trying to print this receipt right-away prior to the proper formatting will not work as the
TM-U220B printer model does not support GS v 0. Instead random characters will print:
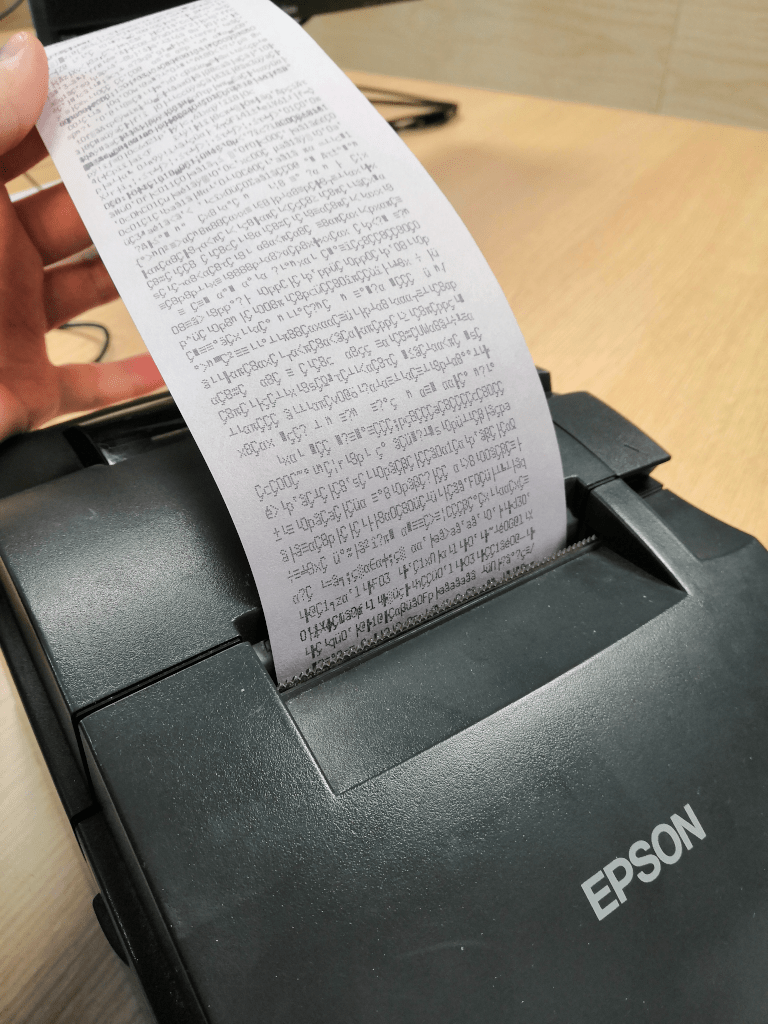
To properly configure formatting for the Epson TM-U220B printer model take the following steps.
After consulting Epson’s website for compatibility for both of the commands: GS v 0 and ESC *, it can be seen
that indeed the TM-U220B is not compatible with GS v 0, but is compatible with ESC *.
When adding the printer, CUPS will ask which printer should be added:
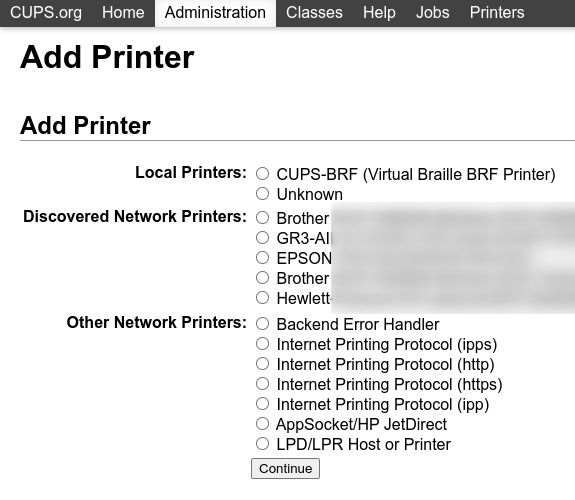
In this case, the printer is connected via USB so it won’ be part of the Discovered Network Printers. Instead it is likely part of the Unknown selection under Local Printers. By unplugging the printer’s USB cable from the IoT box and refreshing the page, the Unknown printer disappears. By plugging it back in, the printer reappears, so it can be said that this is the printer in question.
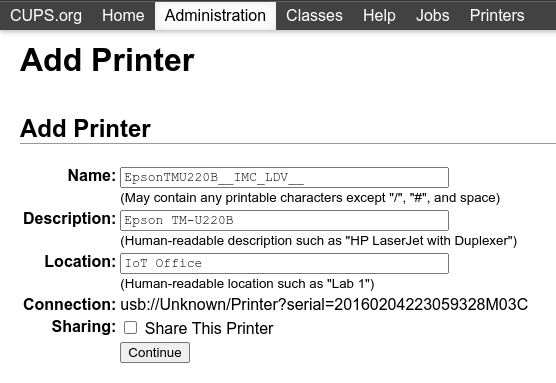
For the naming convention, since it needs to print using the ESC * command, it is imperative to
add __IMC. Reference the printer model on Epson’s ESC * site to find out more
about the density parameters.
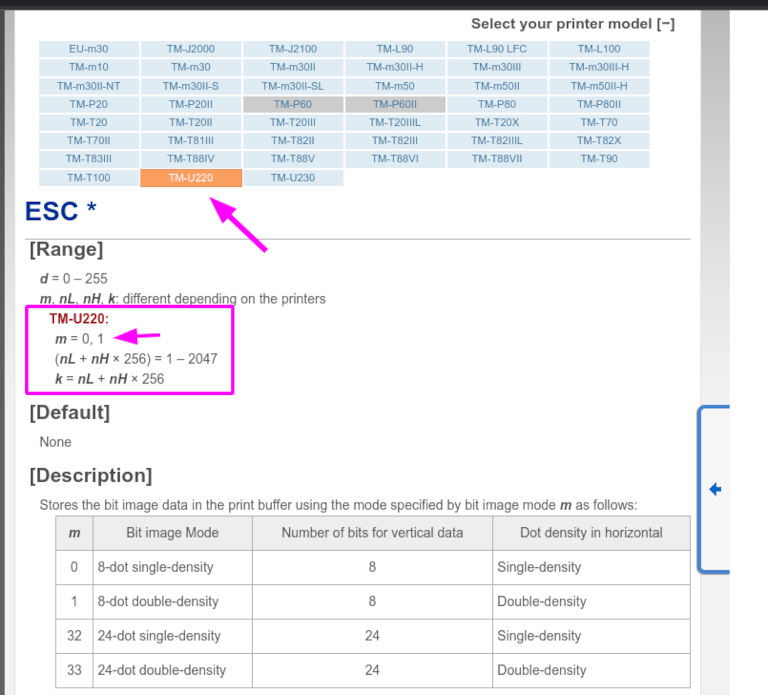
For this particular model, TM-U220, m should be equal to 0 or 1. While referencing the
Description below the pink box in the above picture, the m values could be 0, 1, 32
or 33. So in this printers case, the m value can NOT be 32 or 33 (otherwise there will be
random characters printed).
The table includes the numeric values: 32 and 33, they both occur if the Number of
bits for vertical data is set to 24. This means that is a High Vertical Density. In the case
of configuring the Epson TM-U220, the Low Vertical Density will need to be forced, as this
printer model does not support High Vertical Density for this command ESC *.
To add a Low Vertical Density, add the LDV parameter to the naming convention.
Click Continue to proceed. Next, set the Make value to Raw and for the Model value, set this to Raw Queue (en).
However, when trying to print with the naming convention: EpsonTMU220B__IMC_LDV__, it prints
the receipt, but it is too big and outside the margin. To resolve this, add a new printer (and
naming convention) with the SCALE<X> parameter to adapt to our receipt size.
以下是一些例子:
Printer Naming Convention |
|
|
|
|
|---|---|---|---|---|
|
|

|
|

|
|
DYMO LabelWriter print issue
The DYMO LabelWriter has a known issue in printing with the IoT box. The OpenPrinting CUPS server installs the printer using Local RAW Printer drivers. In order to print anything, the correct Make and Model needs to be set, so the correct driver is referenced when using the device.
Additionally, a new printer needs to be added to reduce a print delay that occurs after updating the driver.
重要
The DYMO LabelWriter 450 DUO printer is the recommended DYMO printer for use with Odoo and the IoT box. It must already be connected to, and recognized on, the IoT box.
The DYMO LabelWriter 450 DUO printer contains two printers in one: a label printer and a tape printer. Choosing the correct model (either DYMO LabelWriter 450 DUO Label (en) or DYMO LabelWriter 450 DUO Tape (en)) is crucial when configuring the following processes.
To keep things consistent, both of the following processes detail the configuration for the DYMO LabelWriter 450 DUO Label (en) model. Change the model when needed.
DYMO LabelWriter not printing
In the case where the DYMO LabelWriter is not printing anything, a new driver needs to be installed.
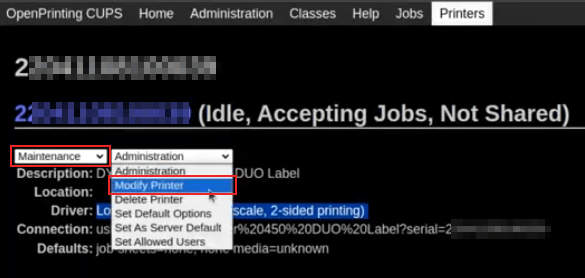
First, open the OpenPrinting CUPS console by clicking at the bottom of the IoT box homepage. Next, click on in the top menu. Click into the printer in question, and select Maintenance in the first drop-down menu. Then, select Modify Printer in the second drop-down menu.
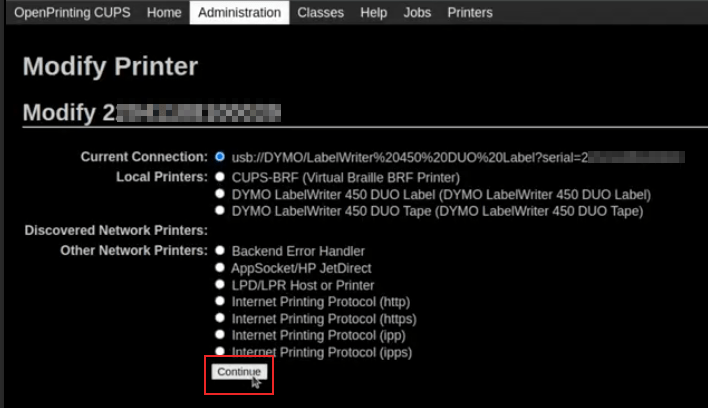
Next, select the specific network connection/printer that the modification should be made on. Click Continue.
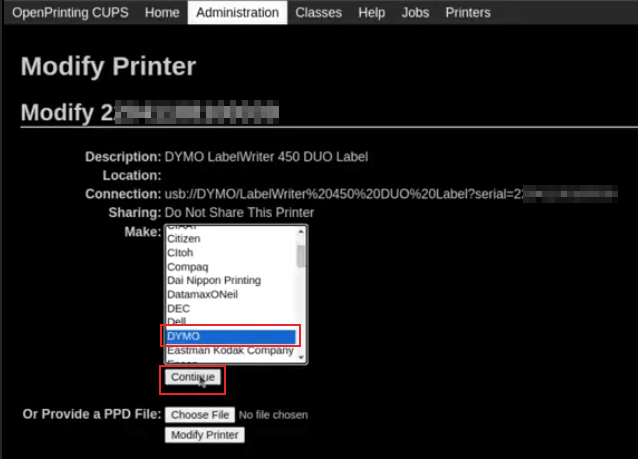
On the next page, click Continue to proceed to set the Make of the printer.

Under Make select DYMO from the menu. Click on Continue to set the Model.
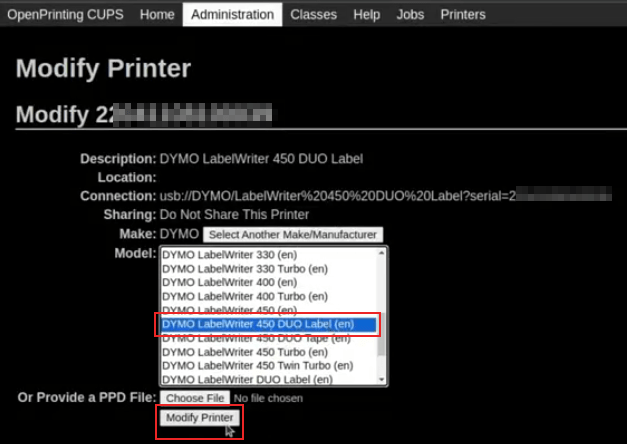
On the following page, set the Model to DYMO LabelWriter 450 DUO Label (en) (or whichever DYMO printer model is being used). Click on Modify Printer to complete setting the new driver, a confirmation page will appear.
After being redirected to a confirmation page, acknowledging a successful update, click on the button in the top menu.
All the printers installed on the OpenPrinting CUPS server appear, including the newly updated: DYMO LabelWriter 450 DUO Label (or whichever DYMO printer model is being used). Click into the printer that was just updated.
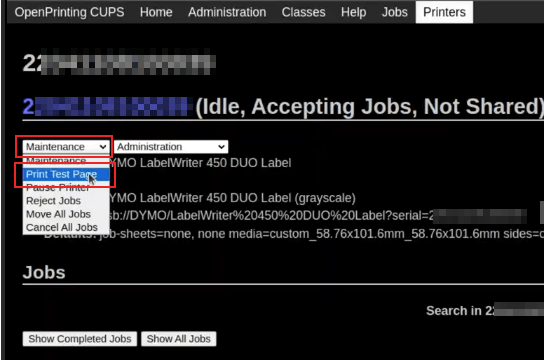
To print a test label, click on the Maintenance drop-down menu to the left of the Administration drop-down menu, and select Print Test Page. The test label will print out with a ten-second delay if the driver update was successful.
To reduce this delay a new printer will need to be added, follow the process below.
DYMO LabelWriter print delay
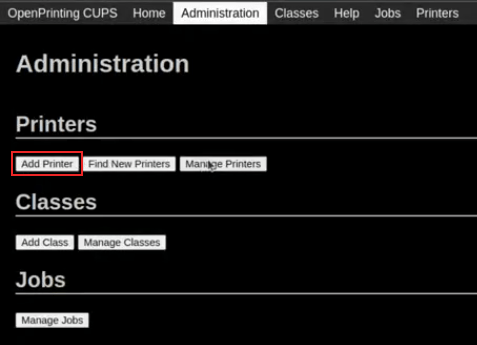
To resolve the delay issue after modifying the driver, the printer must be reinstalled. To reinstall the printer, open the OpenPrinting CUPS administration page by clicking , at the bottom of the IoT box homepage. Then, click on in the top menu, then click Add a Printer.
小技巧
If the DYMO LabelWriter 450 DUO printer is not printing at all, or is not recognizable (has a RAW driver type), then update the drivers on the device. See DYMO LabelWriter not printing.
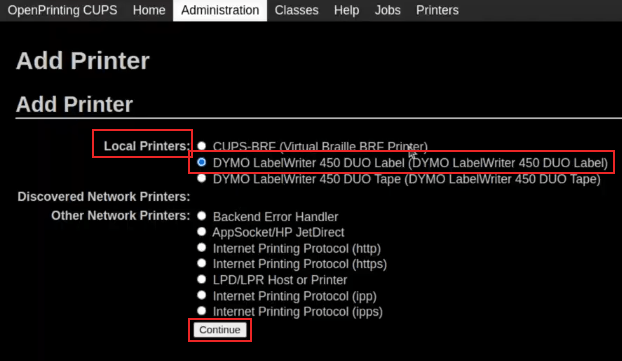
On the next screen, in the Local Printers section, select the DYMO LabelWriter 450 DUO Label (DYMO LabelWriter 450 DUO Label) (or whichever DYMO printer model is being used) pre-installed printer. Click Continue.
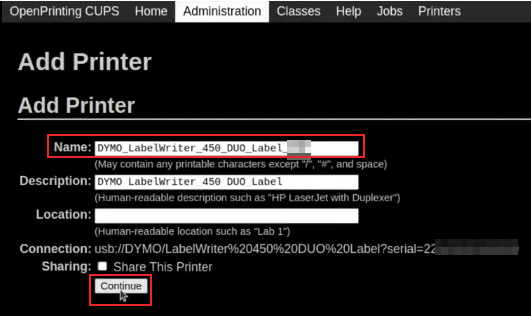
On the following screen, modify the Name to something recognizable, as the original printer will still be present. Click Continue to be taken to the next screen.
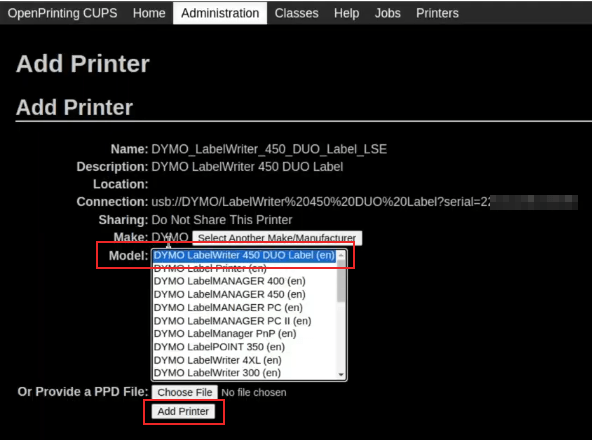
Next, choose the Model. Select DYMO LabelWriter 450 DUO Label (en) (or whichever DYMO printer model is being used), and finally, click Add Printer to complete the installation.
After being redirected to a confirmation page, acknowledging a successful installation, click on the button in the top menu.
All the printers installed on the OpenPrinting CUPS server appear, including the newly installed: DYMO LabelWriter 450 DUO Label (or whichever DYMO printer model is being used). Click into the printer that was just installed.

To print a test label, click on the Maintenance drop-down menu to the left of the Administration drop-down menu, and select Print Test Page. The test label should print out immediately (one-to-two seconds delay).
The Zebra printer does not print anything
Zebra 打印机对打印的 Zebra 编程语言 (ZPL) 代码的格式非常敏感。如果打印机没有输出任何内容或打印空白标签,请尝试通过访问 下)并查找相应的模板来更改发送给打印机的报表的格式。
另请参阅
查看Zebra有关打印 ZPL 文件的说明 此处。
条码扫描仪
The characters read by the barcode scanner do not match the barcode
默认情况下,大多数条码扫描仪都配置为美国QWERTY格式。如果条码扫描仪使用不同的布局,请转到设备的表单视图()并选择正确的格式。
扫描条形码时没有任何反应
确保在 配置中选择了正确的设备,并且条形码配置为在每个条形码的末尾发送一个 ENTER 字符(键码 28)。要这样做,请导航到 。
条形码扫描器被检测为键盘
重要
有些条码扫描器不会将自己标识为条码扫描器,而是标识为 USB 键盘,因此无法被 IoT 盒子识别。
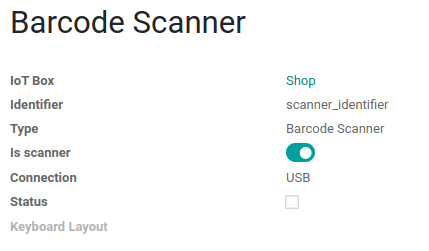
设备类型可以通过转到其表单视图 () 并激活 Is scanner 选项来手动更改。
Barcode scanner processes barcode characters individually
When accessing the mobile version of Odoo from a mobile device, or tablet, paired with a barcode scanner, via the IoT box, the scanner may process each barcode character as an individual scan. In this case, the Keyboard Layout option must be filled out with the appropriate language of the barcode scanner on the Barcode Scanner form page.
小技巧
Access the barcode scanner form page by navigating to .
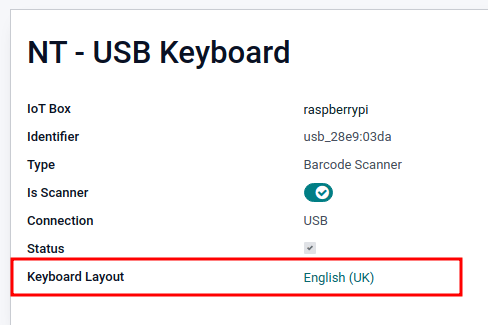
The Keyboard Layout is language based, and the options available vary, depending on the device and the language of the database. For example: English (UK), English (US), etc.
现金抽屉
现金抽屉无法打开
现金抽屉应连接到打印机,并且在 PoS 配置中应勾选 现金抽屉 复选框。要执行此操作,请导航至 。
比例尺
Scales play a crucial role in the checkout process, especially for products sold by weight, rather than fixed pricing.
Set up Ariva S scales
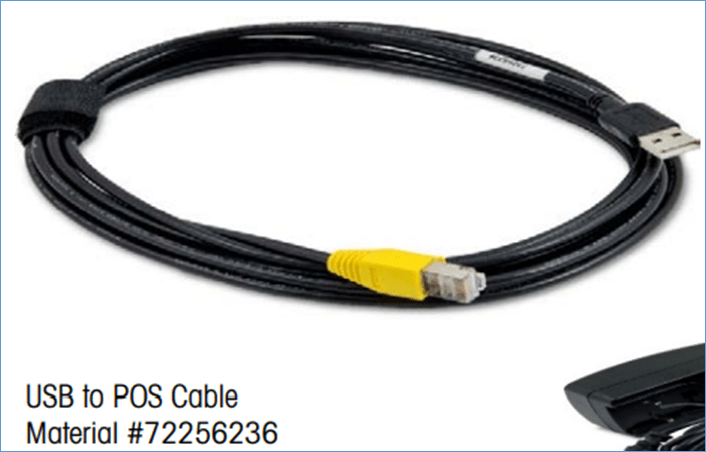
Odoo has determined that a specific setting in Ariva S series scales (manufactured by Mettler-Toledo, LLC.) needs modification, and a dedicated Mettler USB-to-proprietary RJ45 cable is required for the scale to function with Odoo’s IoT box.
To correctly configure the scale for recognition by the IoT box, follow this setup process for the Ariva S series scales.
重要
It is crucial to use the official Mettler USB-to-RJ45 cable during this process.
Cable
The Mettler part number is 72256236 - USB-to-POS cable. Contact Mettler, or a partner, to purchase an authentic cable. Note that no other cable outside of this Mettler cable works for this configuration. Using a serial-only cable attached to a serial-to-USB adapter is not effective.
设置
Refer to Mettler’s Setup Guide for Ariva S series scales during the following configuration: Ariva Checkout Scale User’s Guide.
To begin, go to page 17 in the above manual for Setup. This guide lists potential settings for the Ariva S series scales.
Follow the instructions, along with the following process, to set the scale to setup mode. First, hold the >T< button for eight seconds, or until CONF appears.
Next, press >T< until GRP 3 appears, then press >0< to confirm.
Under 3.1, ensure the setting is set to 1 (USB Virtual COM ports). Press >T< to cycle through the options under group 3.1.
Once 3.1 is set to 1, press >0< to confirm the selection. Continue to press >0< until GRP 4 appears.
Now, press >T< until EXIT appears.
重要
Do not make any other changes unless otherwise needed.
Once EXIT appears, press >0<. Following this, press >0< again to SAVE. Now the scale restarts.
Finally, restart the IoT box to recognize the changes made on the
scale’s configuration. After restarting, the scale appears as Toledo 8217, as opposed to the
previous display, where it appeared as Adam Equipment Serial.