Add new equipment
In Odoo, equipment refers to any item that is used in everyday operations, including the manufacturing of products. This can mean a piece of machinery on a production line, a tool that is used in different locations, or a computer in an office space. Equipment registered in Odoo can be owned by the company that uses the Odoo database, or by a third party, such as a vendor in the case of equipment rentals.
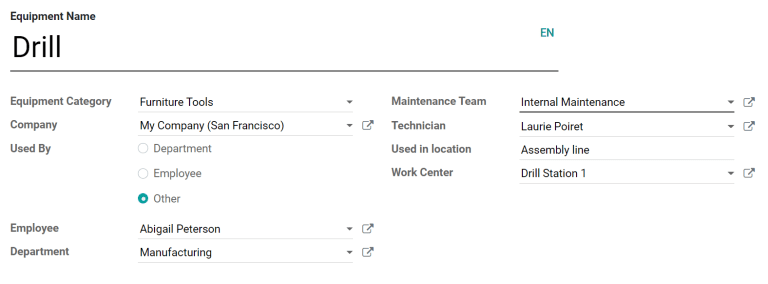
Using Odoo Maintenance, it is possible to track individual pieces of equipment, along with information about their maintenance requirements. To add a new piece of equipment, navigate to the Maintenance module, select , and configure the equipment as follows:
Equipment Name: the product name of the piece of equipment
Equipment Category: the category that the equipment belongs to; for example, computers, machinery, tools, etc.; new categories can be created by navigating to and clicking Create
Company: the company that owns the equipment; again, this can be the company that uses the Odoo database, or a third-party company
Used By: specify if the equipment is used by a specific employee, department, or both; select Other to specify both an employee and a department
Maintenance Team: the team responsible for servicing the equipment; new teams can be created by navigating to and selecting Create; the members of each team can also be assigned from this page
Technician: the person responsible for servicing the equipment; this can be used to assign a specific individual in the event that no maintenance team is assigned or when a specific member of the assigned team should always be responsible for the equipment; any person added to Odoo as a user can be assigned as a technician
Used in location: the location where the equipment is used; this is a simple text field that can be used to specify locations that are not work centers, like an office, for example
Work Center: if the equipment is used at a work center, specify it here; equipment can also be assigned to a work center by navigating to , selecting a work center or creating a new one using the Create button, and clicking the Equipment tab on the work center form

Include additional product information
The Product Information tab at the bottom of the page can be used to provide further details about the piece of equipment:
Vendor: the vendor that the equipment was purchased from
Vendor Reference: the reference code assigned to the vendor
Model: the specific model of the piece of equipment
Serial Number: the unique serial number of the equipment
Effective Date: the date that the equipment became available for use; this is used to calculate the MTBF
Cost: the amount the equipment was purchased for
Warranty Expiration Date: the date on which the equipment’s warranty will expire

Add maintenance details
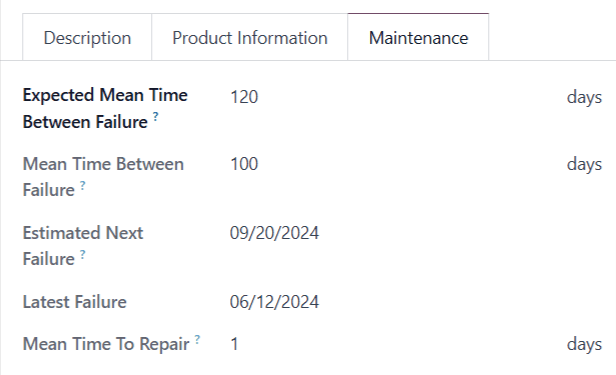
The Maintenance tab at the bottom of the page provides information about the failure frequency of the piece of equipment:
Expected Mean Time Between Failure: the average number of days the equipment is expected to operate between failures. This number can be configured manually.
Mean Time Between Failure: the average number of days the equipment operates between failures. This number is calculated automatically based on previous failures, and cannot be configured manually.
Estimated Next Failure: the estimated date the equipment may experience its next failure. This date is calculated automatically based on the data in the Mean Time Between Failure and Latest Failure fields, and cannot be configured manually.
Latest Failure: the most recent date on which the equipment failed. This date is based on the creation date of the equipment’s most recent maintenance request, and cannot be configured manually.
Mean Time To Repair: the average number of days needed to repair the equipment. This number is calculated automatically based on the duration of previous maintenance requests, and cannot be configured manually.

Tip
To see any open maintenance requests for a piece of equipment, go to the page for the equipment, and click the Maintenance smart button at the top of the page.